DVDs may wear out after being played too many times. Thus, you may want to copy the content from the current DVD to a new blank disc, or to your PC, in order to better keep the original DVD and also for convenient playback. If you are a Windows 8 user and are looking for a way to copy a DVD to a Hard Drive on your Windows 8 PC or to another DVD, you are reading the right article. In this article, we will recommend the two best choices for copying DVDs on Windows 8. You can keep the copied DVD content on your PC, or burn it to a blank DVD. You don’t need to worry about someday your DVDs may wear out anymore!
Way 1. How to Copy DVD on Windows 8 with DVD Copy Software
When you want to copy a DVD to a hard drive on your Windows 8, I bet you may first try to directly right-click the document and choose the ‘Copy’ option. Sometimes it works, but often an error message will occur. That is because most commercial DVDs have a copyright issue and they are not allowed to be copied. Then, how to copy a DVD on Windows 8 successfully? VideoByte DVD Copy will help you.
This best DVD copy software removes all copy protections. You will no longer be bothered by restrictions like being unable to download the original image quality of videos or even being unable to copy anything from the DVDs. You are able to copy protected DVDs on Windows 8 in simple operations, with a 1:1 ratio copy applied.
Sparkling features of VideoByte DVD Copy:
- Copies DVD content to the hard drive on Windows 8 or to a blank DVD disc.
- Preserves all content, including the DVD menus, subtitles, and languages.
- Maintains the original DVD audio quality.
- Supports converting DVD to Video_TS folder or ISO image files.
- Fast copy speed, takes less time to copy.
VideoByte DVD Copy works perfectly on Windows 8, but it is also compatible with Windows 9/10/11 and MAC.
How to Copy a DVD on Windows 8 via VideoByte DVD Copy
The operation process is quite simple. Follow the instructions below:
Step1. Open the Source DVD
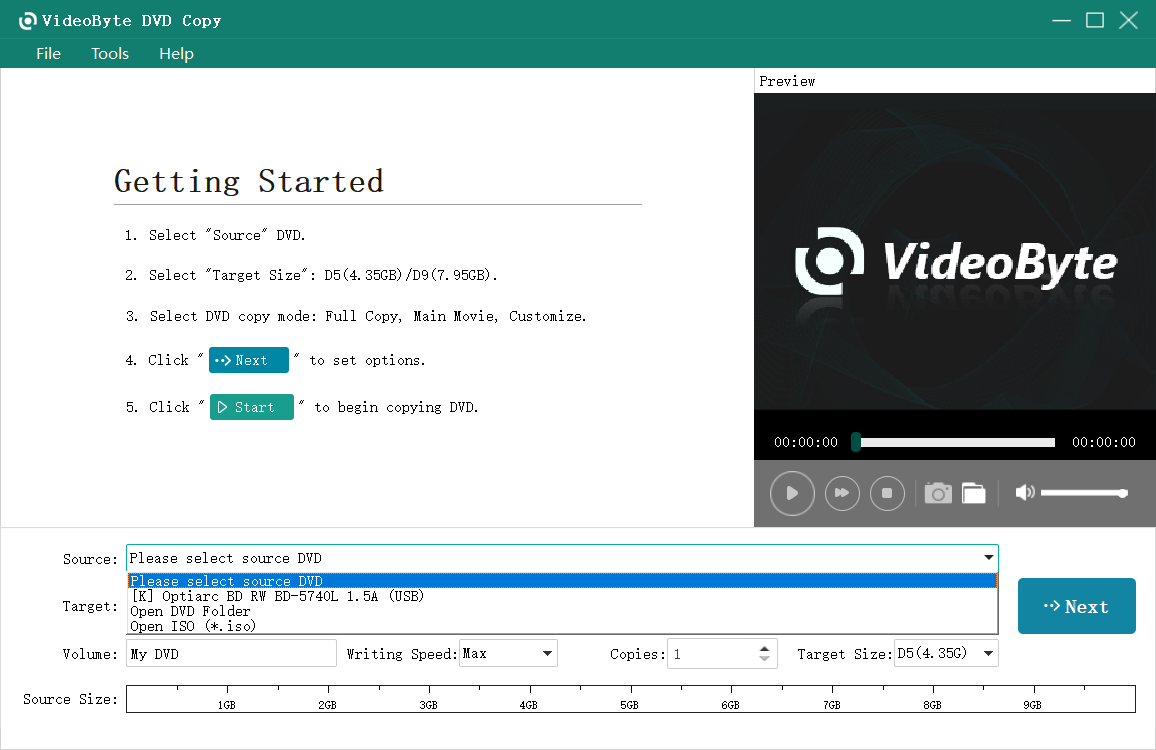
Download, install, and launch VideoByte DVD Copy. Insert the DVD you want to copy into your Windows 8. Then, click on the File button in the upper-left corner, go to Select Source, and then choose the DVD you want to copy. Or, expand the pull-down Source menu and choose your DVD that is ready to copy. It may take a few minutes to load the file.
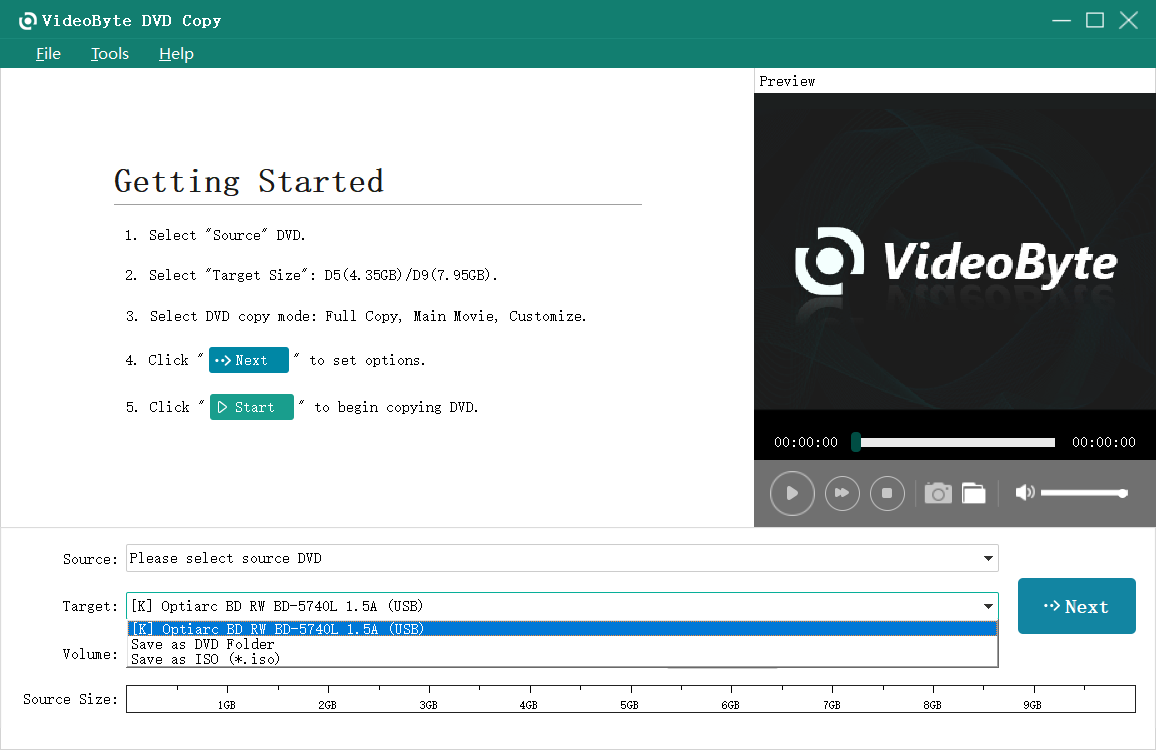
Below the Source menu is the Target options. You can choose to copy this DVD to another DVD, or to your PC.
Step2. Choose Copy Modes
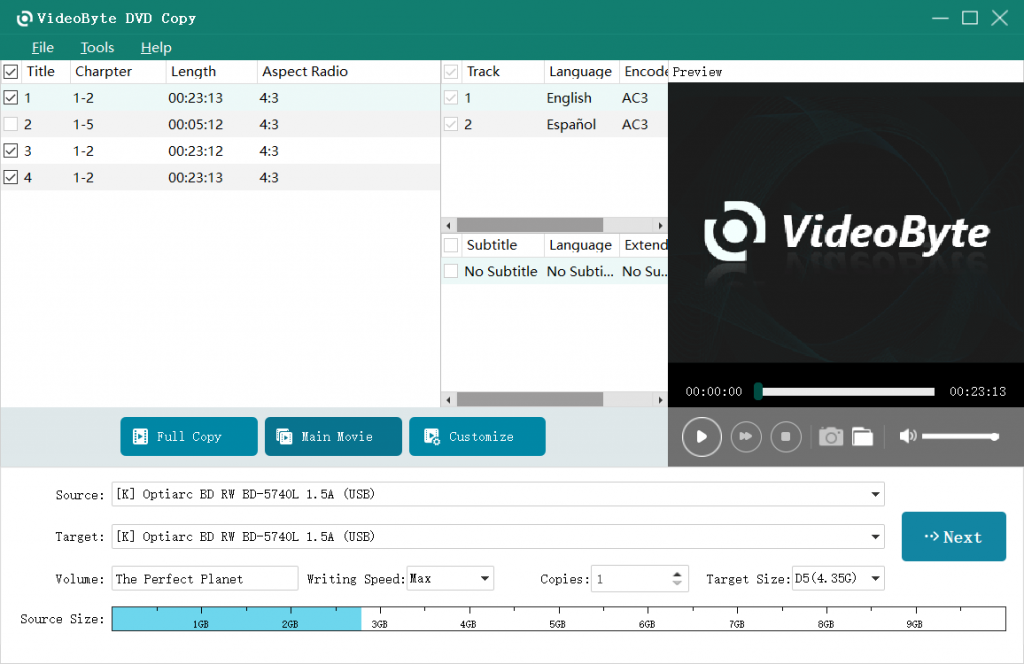
There are 3 copy modes you can choose from: Full Copy, Main Movie, and Customize. It means you can copy the whole DVD, or the main video only, or even choose a specific part you want to copy from the DVD. Press Next to go to the next process.
Step3. Set Output Options and Start to Copy
Select the output options as you need. Press the Start button. All is done and you just need to wait for it to finish the copy process.
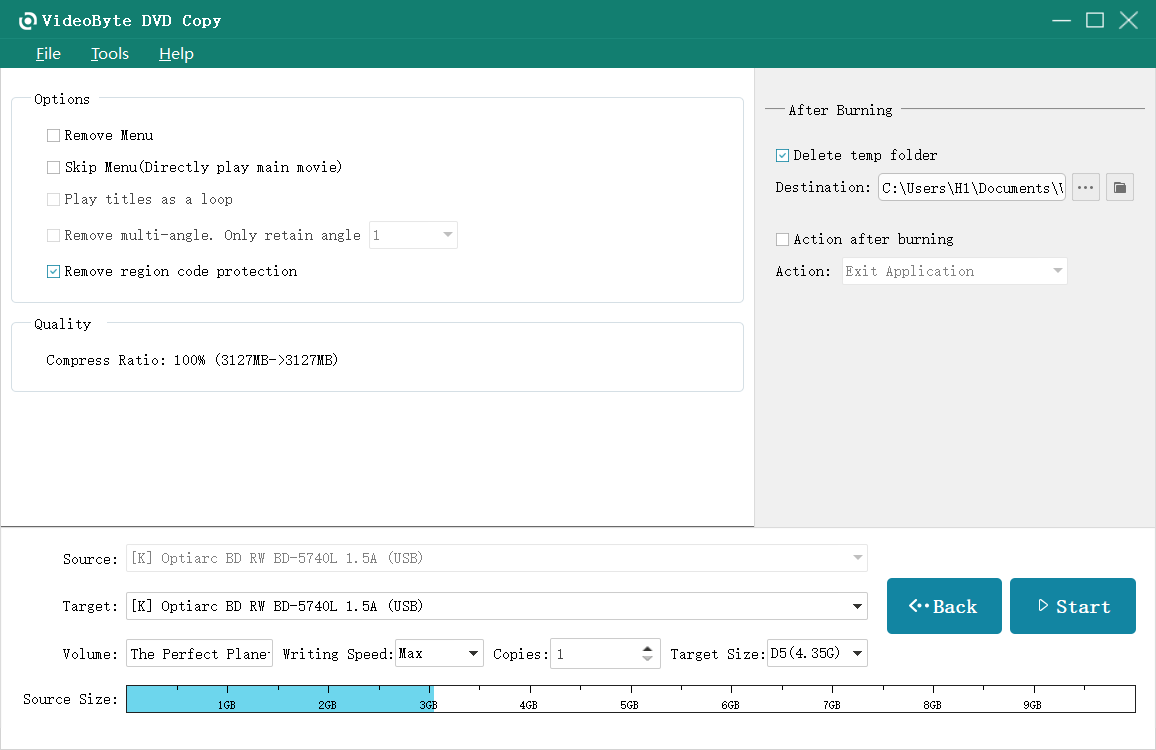
You can choose to copy a DVD to a Hard Drive on your Windows 8 PC/other devices, or to another DVD. For the latter, if your Windows 8 computer has 2 DVD Disc Drives, you can insert the source disc and a blank disc into your computer simultaneously, and then select the blank disc as the target source. But if your computer has only 1 DVD Disc Driver, just copy the content from the source DVD Disc Drive and save it as ISO image files. And then, copy the created ISO image to the black disc drive.
Way 2. How to Copy a DVD to Another DVD on Windows 8
VideoByte DVD Creator is another reliable DVD copy software for DVD copying on Windows 8. It helps you copy content of a DVD into another DVD, or even into a Blu-ray Disc. VideoByte DVD Creator features professional editing functions, with which you can output personalized DVDs.
But it only detects content that is already on your PC, and you need to copy the DVD content to your Windows 8 PC first. However, it is not an easy thing because commercial DVDs are normally under strict copy protections and are not allowed to be copied. So, you can use VideoByte DVD Creator to copy homemade DVDs, which are able to be copied on Windows 8 directly.
Features of VideoByte DVD Creator:
- Supports burning videos downloaded from online video streaming platforms to DVD or Blu-ray Discs
- Supports burning videos in different formats, such as MP4/AVI/FLV/VOB/MPEG and other common formats.
- Built-in video editing tools to customize your videos.
How to Copy a DVD on Windows 8 via VideoByte DVD Creator
The software has a clear interface and it is easy to operate on Windows 8. Follow the below instructions:
Step1. Choose Disc Type
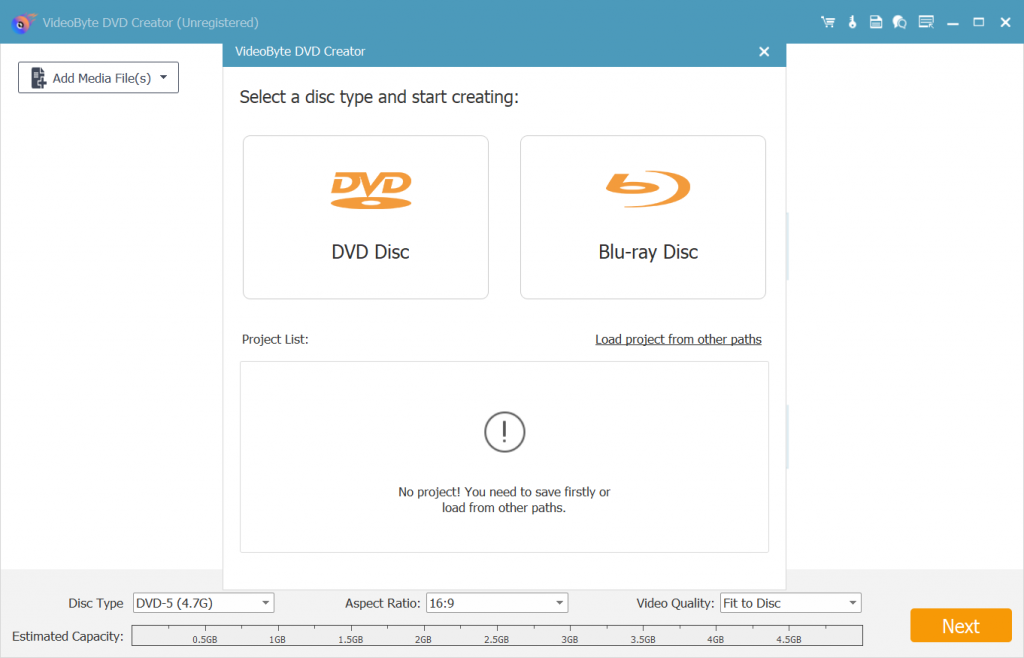
Download, install, and launch VideoByte DVD Creator. Choose to create a DVD Disc first. Or, if you want a Blu-ray disc, this software also provides the option.
Step2. Add Media Files
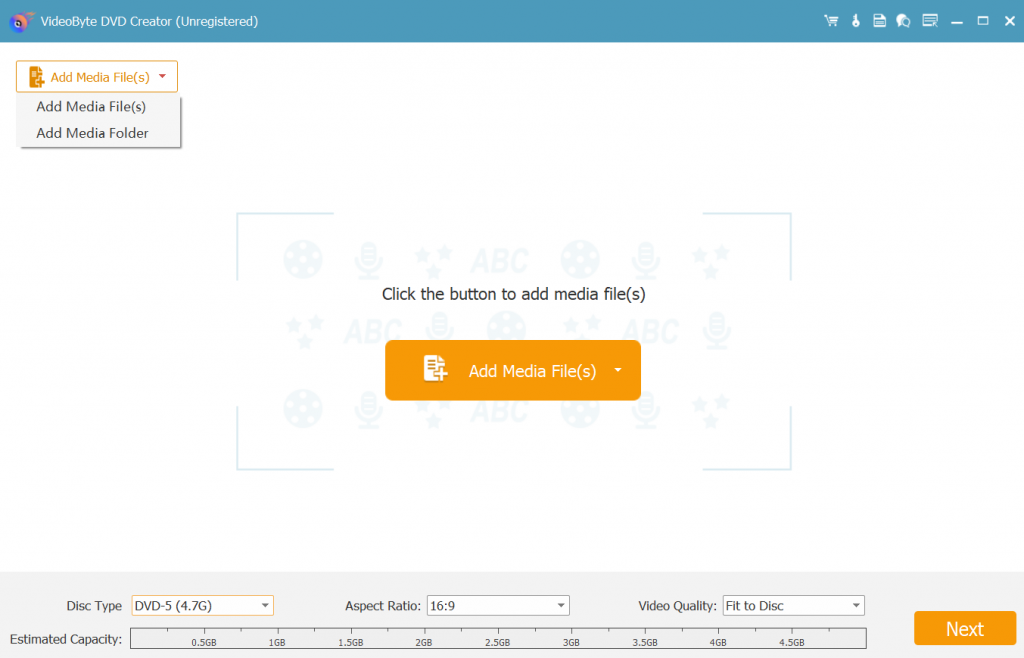
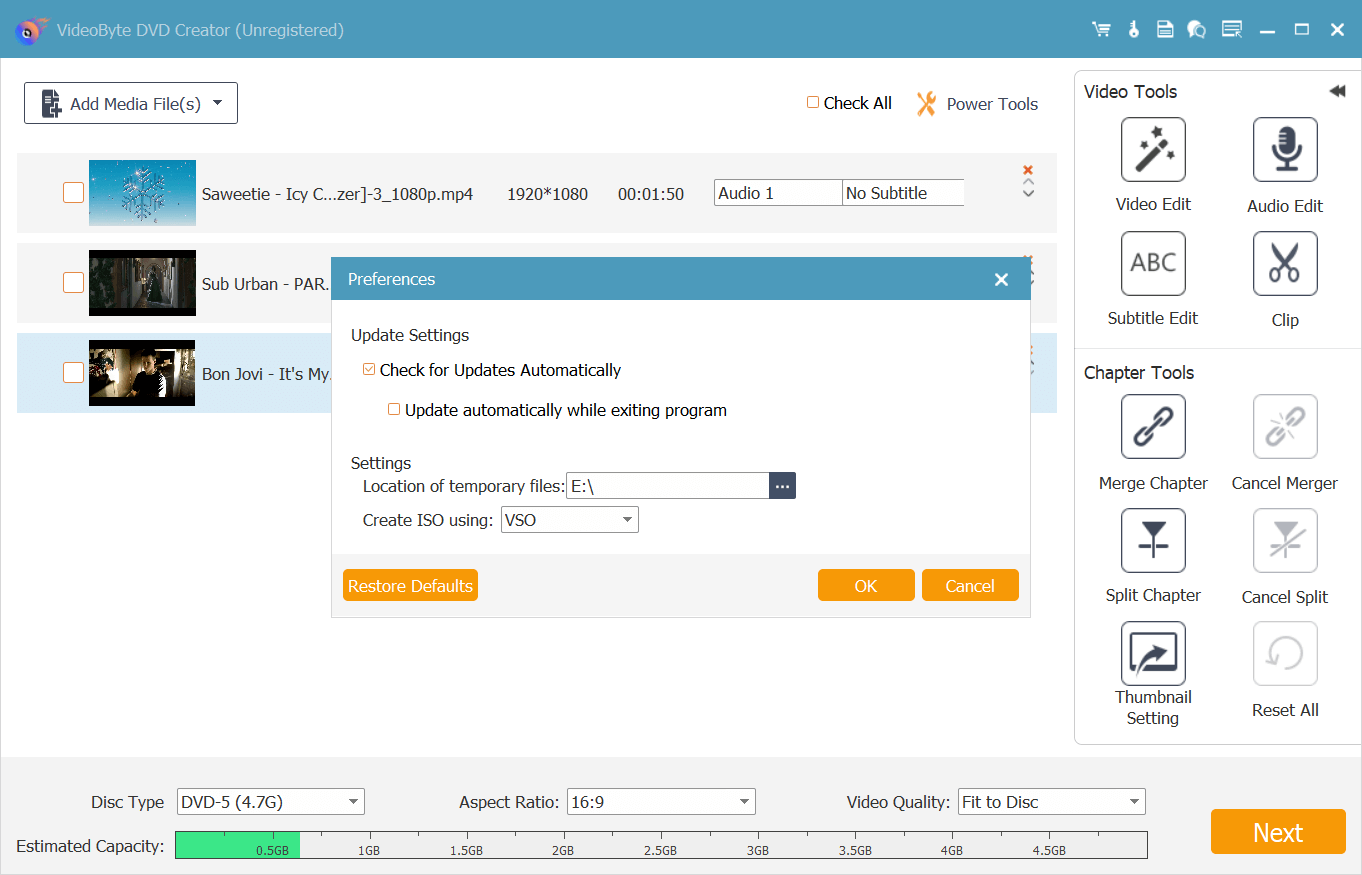
Click the Add Media File(s) button to import the source DVD. Note that you can only copy files that are already on your PC.
Step3. Edit the Video
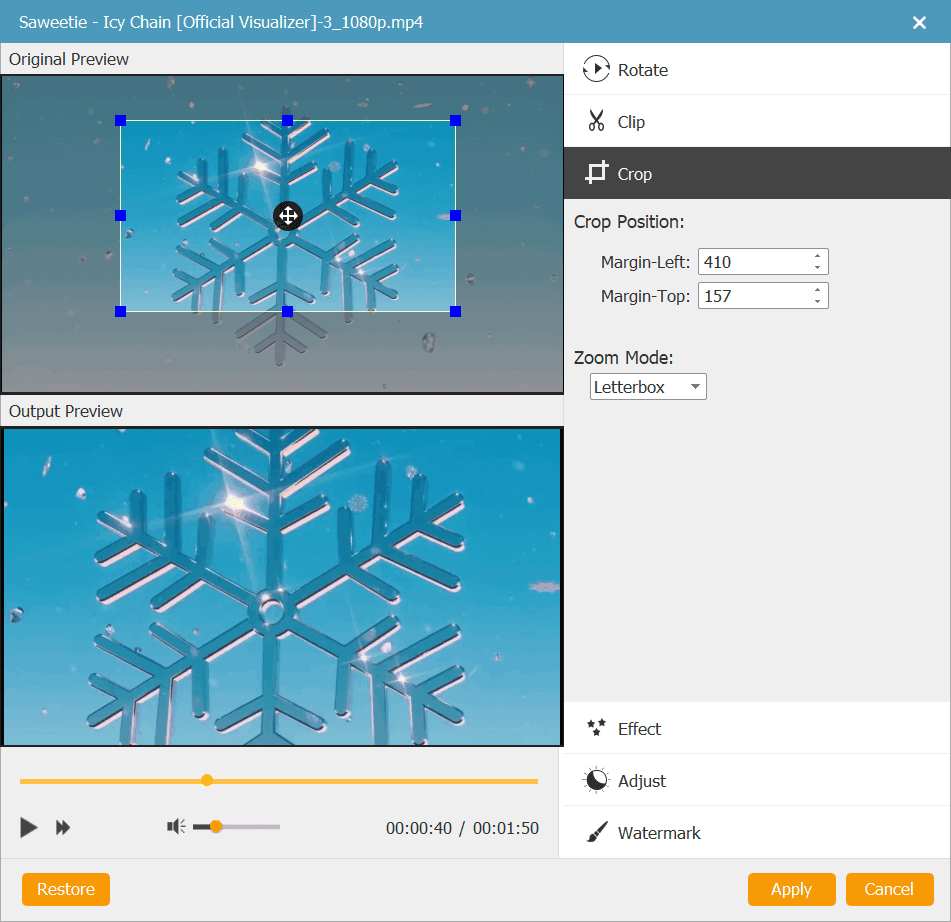
Press the Video Edit button to go to the editing page. You can customize the length of the video, add watermarks, or adjust the video effects. Press Apply after finishing the adjustments.
Step4. Modify Audio and Subtitle
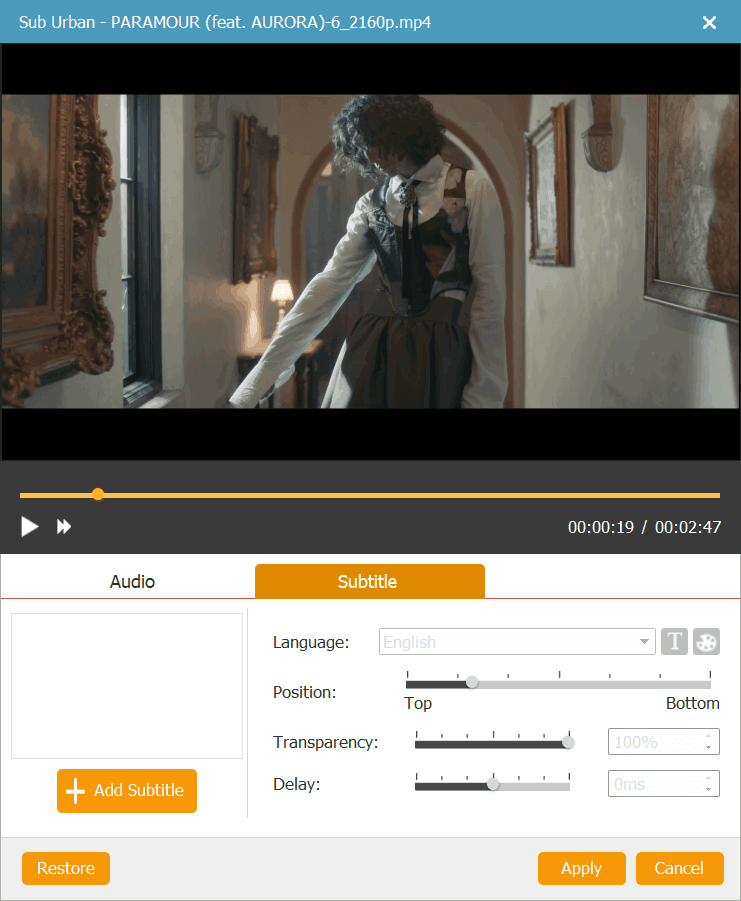
Press Audio Edit / Subtitle Edit to go to the audio and subtitling page. Choose an audio track for your video. And then turn to the subtitle page, press Add Subtitle, and import the subtitle file. Adjust the subtitle position and other basic parameters.
Step5. Customize DVD Menu
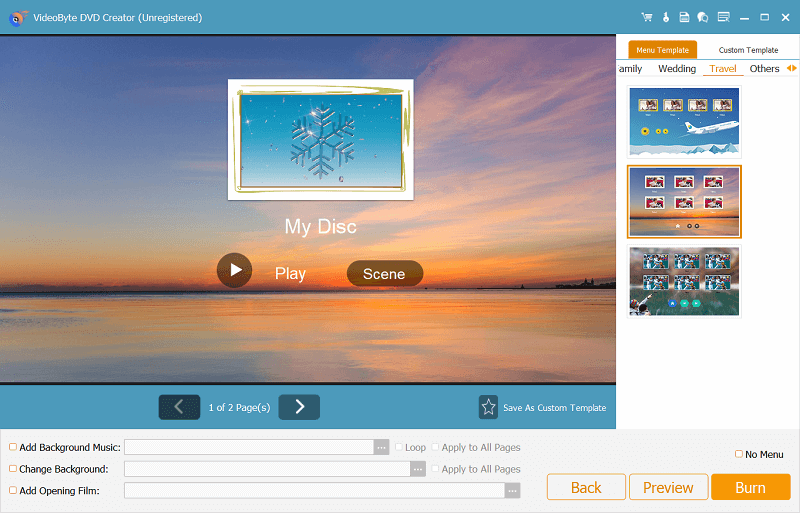
Add a menu for your DVD in the Menu section. You can select a theme and a preset template, and then select the menu frame, button, etc. You can also decide on the menu texts.
Step6. Begin to Burn
Now, press the orange Burn button to begin burning the video to DVD or Blu-ray DVD.
due to strict copy protections on commercial DVD content, you may just use the VideoByte DVD Creator to burn home-made DVDs. If you want to copy a DVD to your Windows 8 PC or to a hard drive, we recommend you use the VideoByte DVD Copy.
FAQs of Copying DVDs on Windows 8
Q1. How do I copy and burn a DVD with Windows Media Player?
If you have a CD or DVD recorder drive(or you can say, a burner) and a blank CD or DVD, you can use Windows Media Play to burn music and other files easily. There are three kinds of discs you can burn with Windows Media Player, listed as follows:
| Type of Discs | Content that you can copy | Expected Capacity | Applicable Player |
|---|---|---|---|
| Audio CDs | Music files | About 80 minutes long of music | Almost all CD players |
| Data CDs | Music files | Roughly 8 hours of music | PCs, some CD players. Make sure the device supports all file formats that you added to the disc. |
| Data DVDs | Music, pictures, and videos | Roughly 54 hours of music | PCs, some DVD players. Make sure the device supports all file formats that you added to the disc. |
Tap the Burn tap in your Windows Media Player, click the Burn options button, and then you can choose to burn an audio CD, or a data CD/DVD.
Q2. How to Play the DVD Copy on Windows 8?
After you copy the DVD content and save them as VIDEO_TS files, you can burn it to a DVD disc, or directly play it on your Windows 8. The location of the DVD files folder can be decided when you copy the DVD. Find it after finishing copying it, and double-click to open the VIDEO_TS files. All video files are in this folder, saved as VOB format files. Click to check the detailed information of each video file to locate the main video. And then use a media player to enjoy it.
Q3. How do I copy a DVD from Windows to a flash drive?
Before copying the DVD content to a flash drive, you need to make sure the capacity of your flash drive is large enough to put the whole DVD content in it. Then, you just need to first copy the DVD to a hard drive on Windows, and then insert a flash drive into your Windows, and copy the video files to your flash drive.
Conclusion
With the help of a VideoByte DVD Copy, you don’t need to worry about the DVD will wear out someday anymore. You can easily copy your favorite DVDs to your Windows 8 PC for convenient playback, or directly copy a DVD to another blank DVD for better preservation. Or, if you need to copy a home-made DVD to another blank DVD, use the VideoByte DVD Creator, you can edit the videos before copying. These two software help to copy a DVD on Windows 8 with simple operations, but the VideoByte DVD Copy removes all copy restrictions and can maintain the original audio quality. Due to the copy protections of most commercial DVDs, you can make use of the VideoByte DVD Copy to better copy your desired DVDs on your Windows 8 PC.


