


When your shelf space is getting scarce, ripping DVD to hard drive such as HDD or SSD becomes a great idea to save space. It also lets you watch your favorite movies anywhere without a DVD drive! All you need is a DVD ripper to digitalize them on your Windows or Mac.
If you have no idea, we have you covered! After testing and researching, we’ve found 5 methods to help you rip your DVD collection quickly and easily! We also collected common questions in the ripping process at the end of the post.
Is it Possible to Copy DVD to Hard Drive Directly?
Yes, but you need different DVD rippers depending on what type of DVDs you have. Typically, there are two types of DVD discs: commercial DVD discs and homemade DVD discs.
- Homemade DVD discs are those you created by yourself without encryption. You can use free tools – HandBrake and VLC – to easily rip your homemade DVDs to hard drives for free and play the DVD video normally with some media players on the computer.
- Commercial DVD discs are the DVDs protected by region codes and copy protections – your movies and TV series – which make it difficult to rip DVDs to external hard drives. You’ll need professional ones like VideoByte with the capability to get past the encryption on the commercial discs that the free rippers can’t.
Generally, for homemade ones, free tools and professional DVD rippers can easily rip DVD to hard drive. But for copy-protected DVDs, free tools are not workable. In the following sections, we will introduce 5 methods for ripping homemade or protected DVD to hard drive.
>>Here to know more details: How to Rip Copy Protected DVD
How to Rip Protected DVD to Hard Drive in Digital Formats (Fastest)
Best for Copying DVD with DRM protection to hard drives
Digitizing DVDs to video formats compatible with common hard drives.
The fastest way to rip bunches of DVDs to a hard drive is to use a DVD ripper that runs smoothly with fast speed conversion. VideoByte BD-DVD Ripper is the one.
It offers 6X faster speed for copying DVDs to hard drives. It also supports 300+ digital formats like MP4, MKV, MOV, AVI, etc., to make your ripped videos playable on TV, Android, and other common devices. Better yet, it strips off copy protection like APS, CSS, ARccOS, CPRM, AACS, BD+, Cinavia, and region codes from your encrypted DVDs. Therefore, you can enjoy the protection-free DVD content playback in regular video formats anywhere.
VideoByte BD-DVD Ripper: Help You Rip DVD Ripper to Hard Drives Efficiently
- Rip DVD Collection with Ultra-Fast Speed: Rip dozens of DVDs at up to 6X faster speed without hassle, faster than HandBrake and VLC.
- Keep Best Output Quality: Ensure up to the lossless quality of 1080p and 4K at a 1:1 ratio.
- Play Digital Videos Anywhere: Digitalize your DVDs and Blu-rays to 300+ digital formats, DVD folders, and DVD ISO images to watch them on your computer, TV, or other playback devices.
- All Content Included: Keep all chapters, audio tracks, and subtitles for original playback.
- Preset Templates: Provide templates for all types of digital formats, devices, and platforms.
- Special Video Editor: Allow you to cut, crop, merge, adjust effects, add filters, and add watermarks to digital videos.
VideoByte BD-DVD Ripper is easy to use. Here’s how to use the DVD ripper to rip copy-protected DVD to hard drive in a few steps. Or, you may want to scroll down and watch the video tutorial.
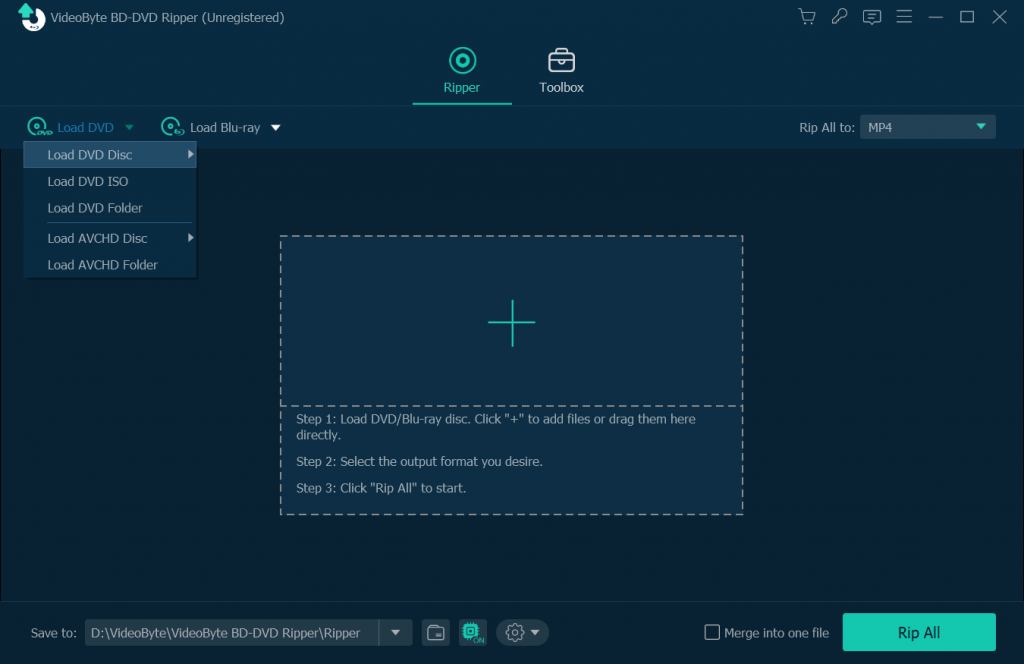
Step 1. Insert a DVD Disc and Hard Drive
To use a DVD ripper tool, you need to insert your copy-protected DVD into the built-in DVD drive that reads DVD discs. Or you can get an external DVD drive if your computer does not have a built-in drive. Also, you should connect your hard drive to the computer.
Step 2. Open VideoByte DVD Ripper and Import DVD
Download and install the DVD ripper and open it. Now find the “Load DVD Disc” button to import your DVD content. It will take a few minutes to finish the loading process.
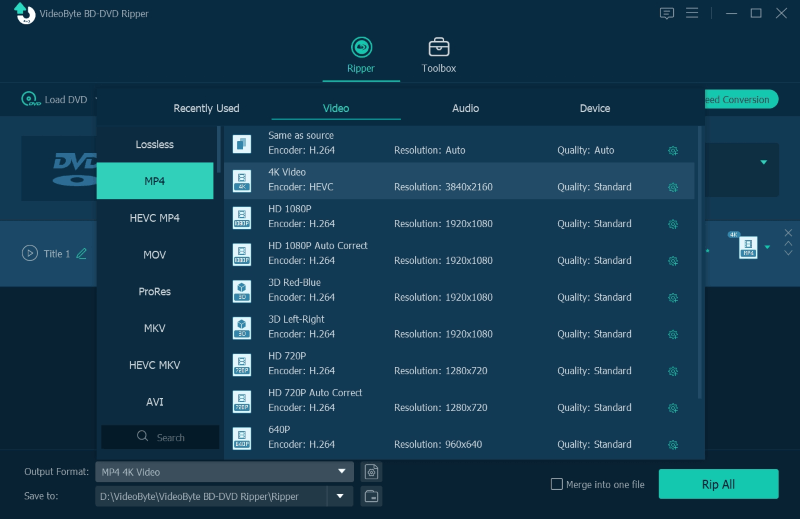
Step 3. Select Your Desired Format for Ripping DVD
Click the icon on the output format section to select a format compatible with your media player.
Tips: To copy DVD to another hard drive or other devices, you can select the most popular format – MP4, as this format can be compatible with almost all devices.
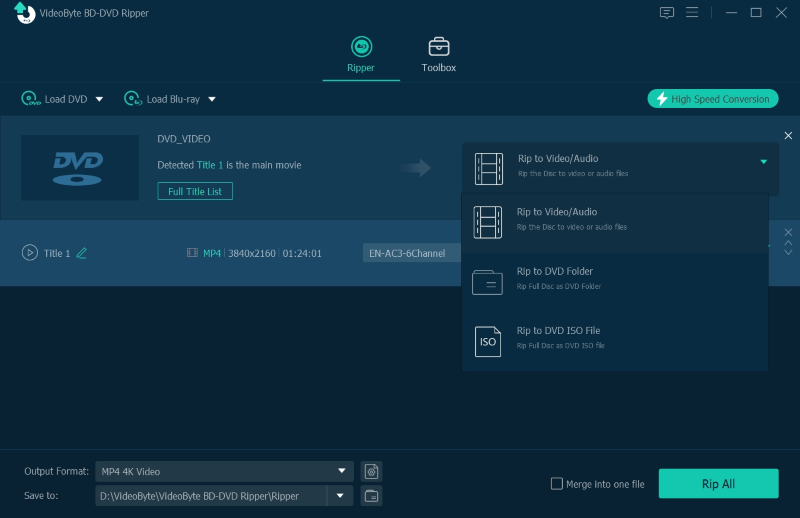
Step 4. Start Ripping DVD to Hard Drive
Change the output folder in the left corner to the directory folder of your hard drive. After that, click the “Rip All” button to start ripping DVD to hard drive.
(Optional) Step 5. Transfer DVD to Hard Drive
If you forget to connect your external hard drive to your computer, you can first find the output DVD digital content in the destination folder you’ve chosen.
Then how to put DVDs on a hard drive according to your needs? Pretty easy. Just open the folder and find the ripped DVD, and connect the hard drive to your computer. Finally, drag the DVD content to your hard drive icon. Or simply copy and paste the content to transfer DVD to hard drive. Now, you can fully enjoy the DVD movies on your hard drive.
A Tutorial Video on How to Rip DVD to Hard Drive in Digital FormatsHow to Copy Protected DVD to Hard Drive with Lossless Quality
Best for Burning DVDs to another disc or copying DVDs to flash drive with default menu.
Another best way to copy DVD to hard drive is using a DVD copying tool. VideoByte DVD Copy can copy DVDs to hard drives with original quality. This intuitive program lets you make an entire copy of a DVD to the Video_TS folder or ISO image file, and then you transfer them to HHD or SSD as backups. Also, it’ll keep the menu along with subtitles and audio tracks for the same experience.
VideoByte DVD Copy: Copy DVDs to Hard Drive with Original Quality
- DVD to DVD Clone – Directly copy DVD movies to another blank disc with original quality.
- DVD Decryption– Remove DRM protections like APS, CSS, ARccOS, CPRM, and region codes.
- 3 Different Copy Modes– Copy all DVD movies or selected ones with preferred tracks and subtitles.
- Ease of Use– Require no burning knowledge and is foolproof to get down to the copy software.
- Fast as Flash– Set up 2X or max writing speed to save you a lot of time in copying DVD movies.
- Free Edition Available: Let new user to copy 3 DVDs for free in 15 days.
To keep the best of the DVDs, VideoByte DVD Copy is totally worth a shot. Now, let’s see how to copy DVDs to hard drive with it below followed by a video tutorial.
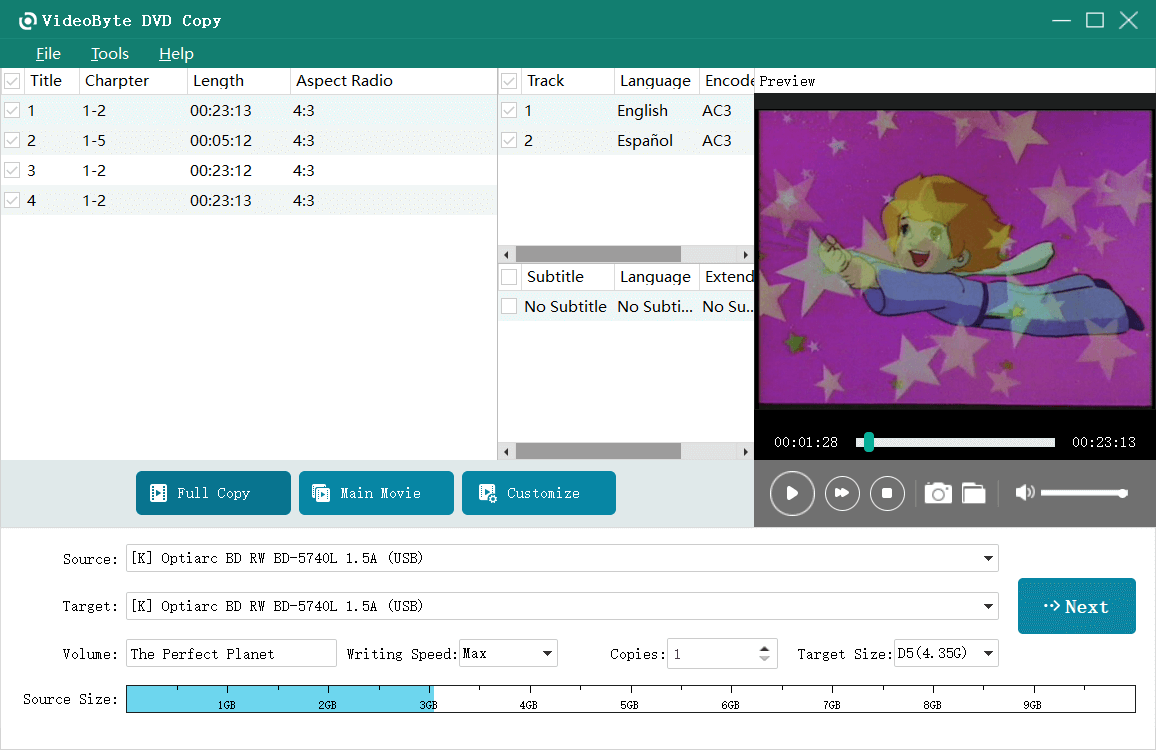
Step 1. Load DVD Source
Download and Install VideoByte DVD Copy on your PC and then launch it. Insert the DVD disc and then click “File” > “Select Source” to import your DVD.
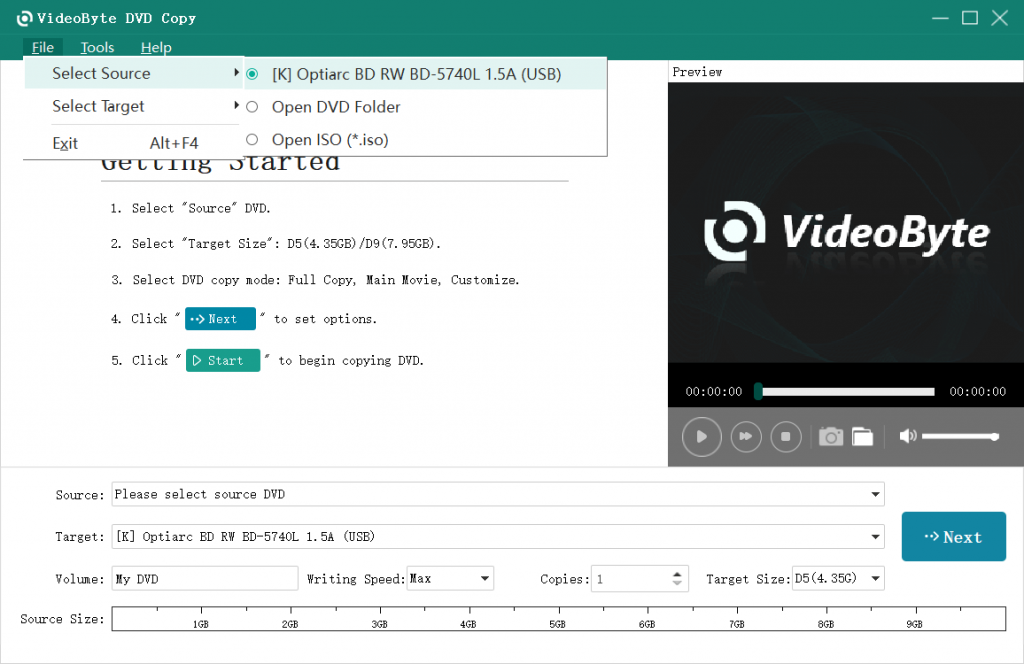
Step 2. Choose DVD Copy Mode
VideoByte DVD Copy provides three copy modes including “Full Copy”, “Main Movie” and “Customize”. You can choose the proper one based on your needs.
- Full copy: Make an entire copy of the DVD including everything.
- Main Movie: Clone the main movie without unnecessary clips.
- Customize: Choose preferred chapters and titles to copy.
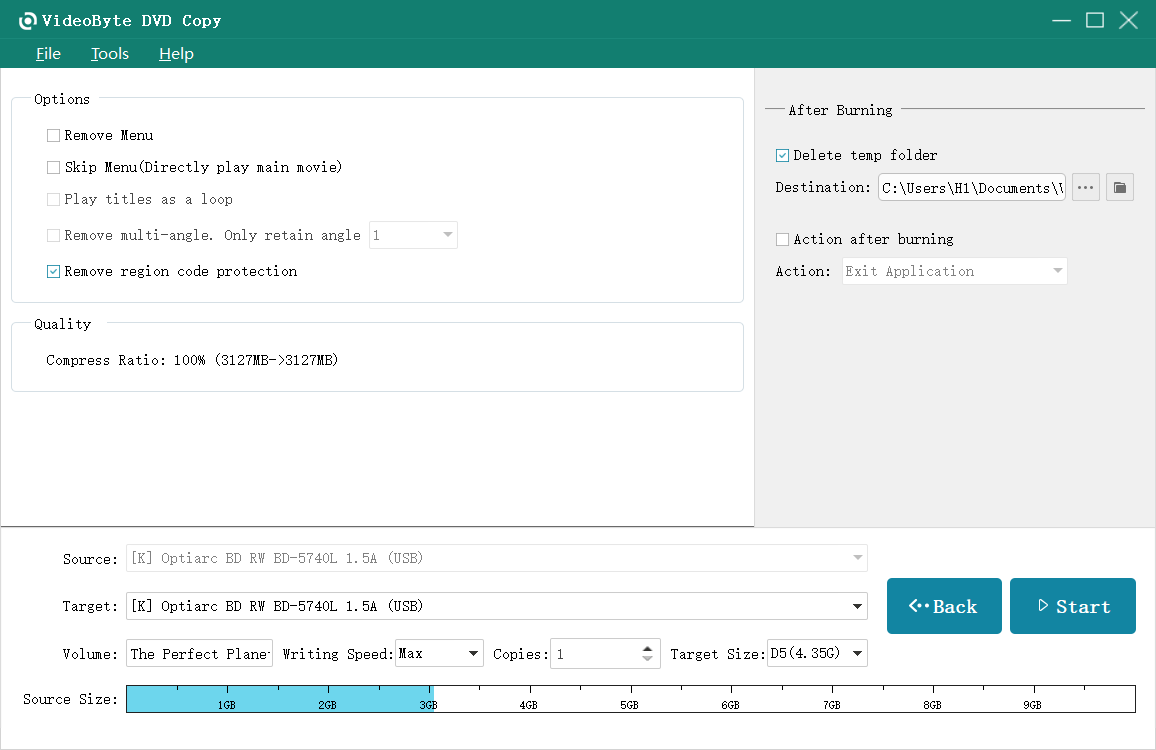
Step 3. Copy DVDs to Hard Drive
In the drop-down list of Target, choose “Save as DVD Folder” or “Save as ISO” and set the destination to the flash drive which you inserted into the computer. Then tap “Start” to begin copying DVD to hard disc.
 See Full Steps on How to Copy DVD to Hard Drive
How to Record Protected DVD to Hard Drive for Digital Backup
Best for Recording clips of DVD movies to HD MP4.
If your DVD is encrypted, you can record it and then transfer the DVD content to a hard drive. For this, VideoSolo Screen Recorder is a nice choice. Because of DRM protections, regular video recorders will get a black screen. With advanced recording technology, VideoSolo can record your DVD movies to MP4, MOV, F4V, WebM, etc with up to lossless quality.
VideoSolo Screen Recorder: Record HD DVDs Before Transfering to Hard Drives
- Exclude other windows to avoid unexpected interruptions.
- Save DVD clips with 1080p and 4K resolutions at up to 60fps.
- Offer 20+ recording modes to cater to all kinds of scenarios.
- Add real-time annotations during the video recording.
- Set a schedule for the automatic recording process.
Now, let’s grasp the idea of how to backup DVD to hard drive with VideoSolo Screen Recorder in a few steps.
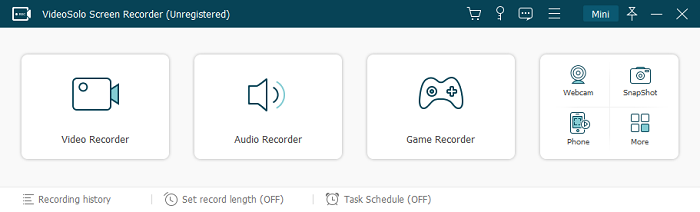
Step 1. Download and Launch VideoSolo Screen Recorder
Connect your DVD and hard drive to your computer. Next, download and launch VideoSolo Screen Recorder. Now, choose “Video Recorder” to proceed.
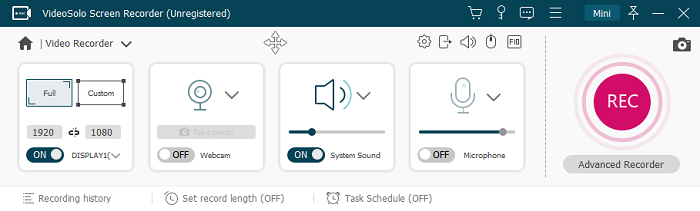
Step 2. Open Your DVD for Recording
Select the recording area and customize the settings. Then, start playing the movies on your DVD.
Step 3. Start Recording and Save the Recorded DVD Movie
Click the “REC” button to start recording. And click the red square icon to stop the recording. Then you can successfully copy DVD to your computer and transfer the content to hard drive.
How to Copy Homemade DVD to Hard Drive for Free (2 Options)
If you aim to rip homemade DVDs, the methods mentioned above are feasible. Apart from those, there are some of the best free DVD rippers that enable you to copy DVD movies to hard drive free of charge, among which VLC media player and HandBrake stand out. Now, let’s walk through them in this part.
Option 1. How to Rip DVD to Hard Drive with VLC
VLC media player is an open-source and multi-functional player, which also can convert DVD to digital formats like MP4, WMV, MKV, etc., letting you watch digital files on TV, phones, and so on. The video quality can also be set the same as the source DVD movies.
However, there is a reminder that you cannot use it to rip protected DVDs. Also, it’s unable to save the menu, subtitles, and audio tracks. Some users complain about its slow speed. If you also encounter the same issues, try VideoByte to rip your DVD to hard drive effortlessly.
|
More Features Free to rip homemade DVDs. Keep the original quality of DVD movies. |
| Best for converting only one or two DRM-free DVDs. |
It may be a bit cumbersome for new beginners to get started. Here’s how to copy DVD to hard drive using the VLC media player step by step.
Step 1. Insert your DVD and hard drive into your Windows and Mac.
Step 2. After your download and install the VLC media player, launch it on the desktop.
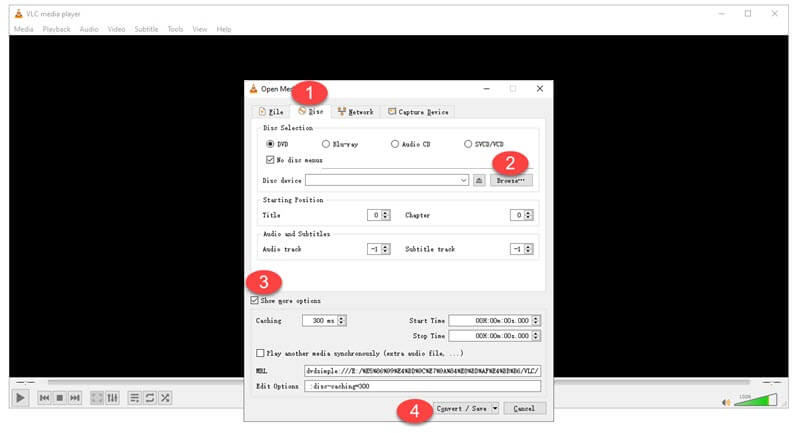
Step 3. Go to “Media” “Convert/Save” > “Disc” and select “DVD”. Then, click “Browse” to load your DVD.
Step 4. Click the Drop-down menu below and choose “Convert”. Next, go to the “Edit” icon and set up parameters like output format, video codec, quality, frame rate, and so on.
Note: If you don’t which format to choose, go with MP4 or click here for other options and the reasons.
Step 5. Choose the flash drive as the destination and click “Start” to rip DVD to hard drive.
If your DVD is copy-protected, check the steps on using VLC to rip them to hard disc in this post:How to Rip DVD with VLC [Protected DVD Included].
Option 2. How to Rip DVDs to Hard Drive with HandBrake
HandBrake is also a noted video transcoder that lets you convert DVDs to hard drive in MP4, MKV, WebM, etc for free. Moreover, it provides tens of preset profiles for devices and social platforms that make a quick ripping. However, you should be aware that it cannot rip DVDs to ISO files or DVD folders. Also, it doesn’t support DVDs with DRM protection or fast speed like VideoByte does.
|
More Features Free to rip DRM-free DVDs and Blu-ray discs. Offer a range of presets for instant ripping. Allow you to choose preferred titles, tracks, and subtitles. |
| Best for Allow you to choose preferred titles, tracks, and subtitles. |
Now, you may want to see how HandBrake works. The following tutorial will show you how to put DVDs on a hard drive with HandBrake.
Step 1. Download and install HandBrake from its official site. Then, run the program on your computer.
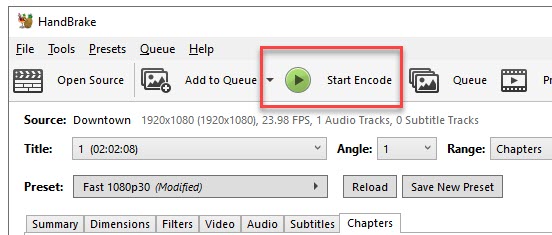
Step 2. Insert the DVD and choose it on the left to load it in HandBrake.
Step 3. After that, choose titles, chapters, subtitles, and audio tracks to keep. Also, select a preset or output format.
Step 4. Connect your hard drive to the computer and select it as the destination.
Step 5. When you’re all ready, click the “Start Encode” button to rip DVDs to hard drive.
Comparison Between 5 DVD to Hard Drive Methods
So far we’ve introduced 5 methods to copy DVD to hard drive to you. To help you conclude their features and quickly find the most suitable one, we’d like to show you a table to make a comparison.
| Supported DVD | Video Quality | Protected DVDs | Ripping Rate | DVD Menu | Titles/Tracks Selection | |
| Using VideoByte BD-DVD Ripper | Copy-protected DVD, homemade DVD | Up to lossless | √ | 5X | × | × |
| Using VideoByte DVD Copy | Copy-protected DVD, homemade DVD | Up to lossless | √ | 2X and above | √ | √ |
| Using VideoSolo Screen Recorder | Copy-protected DVD, homemade DVD | Up to lossless | √ | 1X | × | × |
| Using VLC Media Player | Homemade DVD | HD | × | 1X | × | × |
| Using HandBrake | Homemade DVD | HD | × | 1X | × | √ |
Overall, using VideoByte BD-DVD Ripper is the best way to copy DVD to hard drive, as VideoByte has the capability to put both copy-protected DVDs and homemade DVDs on a hard drive without any quality loss. 5X ripping speed also makes it the fastest way to rip DVD to hard drive. If you just want to backup homemade DVD to hard drive, VLC and HandBrake are valuable options to try out.
3 Common FAQs of Ripping DVD to Hard Drive
There are 3 frequently asked questions about copying DVD to hard drive, and you may want to look them up if you still have questiosn in mind.
1. How to copy DVD to external hard drive to watch on TV?
You can use VideoByte BD-DVD Ripper to copy your DVD movies to the external hard drive for TV playing by following the steps:
Step 1. Download and install VideoByte BD-DVD Ripper on your computer.
Step 2. Insert the DVD you want to copy into your computer’s DVD drive or an external DVD drive connected to your computer. Connect the hard drive that is to store your DVD content to the computer.
Step 3. Open VideoByte BD-DVD Ripper and click the “Load DVD” button to import your DVD content.
Step 4. Select the format that your TV supports, choose it as the output format, and select the hard drive to be the output destination.
Step 5. Click “Rip All” and wait for ripping completed. Then, you can watch the DVD movie stored on the hard drive on TV.
2. What is the fastest way to copy DVD to hard drive?
The fastest way to copy DVD to hard drive is by using a high-speed DVD ripper. Make sure the ripper is the latest version, not a buggy one. Of all the methods above, VideoByte BD-DVD Ripper offers 6X speed with tech support, helping you copy DVD to an external hard driver quickly and easily. Try it free trial to test its ripping speed!
Besides, your network condition and the size of the DVD content also influence ripping speed.
3. What is the best format to rip DVD to hard drive?
Hard drive is compatible with many video formats, but your media players and devices like TV and computer may not. When ripping your DVD collection to a hard drive, choose the video format based on what device or player you will use to watch the videos. Here are some recommendations:
MP4: Generally, MP4 is one of the most commonly used formats that can be played on multiple devices like computers, phones, or TVs. Therefore, to watch your DVD movies conveniently, MP4 is a good choice. If you just want to back up your DVD content to hard drive, using ISO files is a better choice.
MOV: A format developed by Apple. It is compatible with Apple devices like MacBook, iPhone, and iPad as well as software like Quick Time. If you often watch videos on iDevices, then putting MOV DVDs on hard drive can be the best shot.
MKV: A good format for Plex. If you got Plex working on my Roku connected to a TV, MKV is a good option. It also supports lossless video compression, which can result in larger file sizes but better video quality preservation.
4. Is it legal to rip/copy DVDs?
It depends on your purpose. If you solely aim to make a copy for personal use, like backing up DVD to hard drive, you are okay to do so. But it’s important to note that it’s not legal to rent a DVD movie and copy it to create your DVD collection. Buying a DVD and copying it for distribution is not legal either.
Conclusion
This post unfolds 5 methods and corresponding tools to help you effortlessly rip DVD to hard drive. VLC and HandBrake are freeware to rip homemade DVD to hard disk, but they have a lot of drawbacks. They rip DVDs at a slow speed, cannot keep the best quality of DVD movies, and fail to rip protected DVDs. If you have a large DVD collection, the process of ripping DVD with the free DVD rippers can be painful.
In this case, use a premium DVD ripper like VideoByte BD-DVD Ripper to save you time and trouble. VideoByte can rip both homemade and protected DVDs to a hard drive at 6X faster speed. To help you watch your digital files on TV or other devices, it offers over 300 formats to choose from. Download and give it a try. Then you will find out how helpful it can be.