DVDs are becoming less common as digital media continues to dominate the entertainment and music landscape. However, some DVD enthusiasts still cherish DVD collections. To ensure the long-term availability of these DVDs, it has become increasingly important to have them copied out.
This article aims to provide a concise guide on how to copy DVD on Windows 7, including protected or region-restricted DVDs, making users safely save their valuable content with ease.
Let’s explore the straightforward and user-friendly technical ways that enable you to effortlessly create DVD backups on Windows 7 to preserve your beloved media for years to come.
Copying a DVD on Windows 7 with the Best DVD Copy Software [Protected DVD Supported]
To clarify, DVDs without DRM protection or homemade DVDs can be copied directly to an external hard drive. However, the majority of commercial DVD movie discs are protected or region-restricted, which means you need to remove the copyright protection or region code before copying the DVD structure. It is important to know that copying protected DVDs requires some extra steps than just a simple copy and paste.
In this case, professional DVD copy software is needed to ensure a seamless and successful copying process from DVD to hard drive. That is where VideoByte DVD Copy comes into play.
VideoByte DVD Copy is a professional DVD ripping program specially designed to meet the needs of DVD lovers removing DRM protections and making DVD backups. This reliable and user-friendly software supports copying DVD discs to blank DVDs, ISO images, or VIDEO_TS folders, allowing users to save them on their computer or hard disk with a 1:1 ratio. With it, you can freely save the copy for further use later.
Key Features of VideoByte DVD Copy
- Removal of DRM Protection: With advanced decryption technology, VideoByte DVD Copy can easily remove DRM protection such as CSS and region codes, enabling smooth copying of protected DVDs.
- Hard Drive Supported: It not only provides the option to backup DVDs as VIDEO_TS folders, but also allows users to create ISO image files directly.
- Various DVD Formats Supported: The DVD cloner is compatible with all types of DVDs, including DVD-5, DVD-9, DVD-R, DVD-RW, DVD+RW, DVD+R DL, DVD-R DL, and DVD-RAM.
- Lossless Burning: The program ensures a 1:1 ratio copy, preserving the original quality of your DVD and ensuring the same high-quality playback as the original file.
- Fast Copying Speed: VideoByte DVD Copy offers efficient DVD copying speed, saving you time during the copying process.
With these powerful features above, VideoByte DVD Copy provides a seamless and efficient solution for copying DVDs, whether they are protected or unprotected. Follow the simple steps below to duplicate a DVD in Windows 7.
How to Copy DVD on Windows 7 with VideoByte DVD Copy
Now let’s delve into the step-by-step process and learn how to copy DVD on Windows 7 with ease.
Step 1: Load Source Files to VideoByte DVD Copy
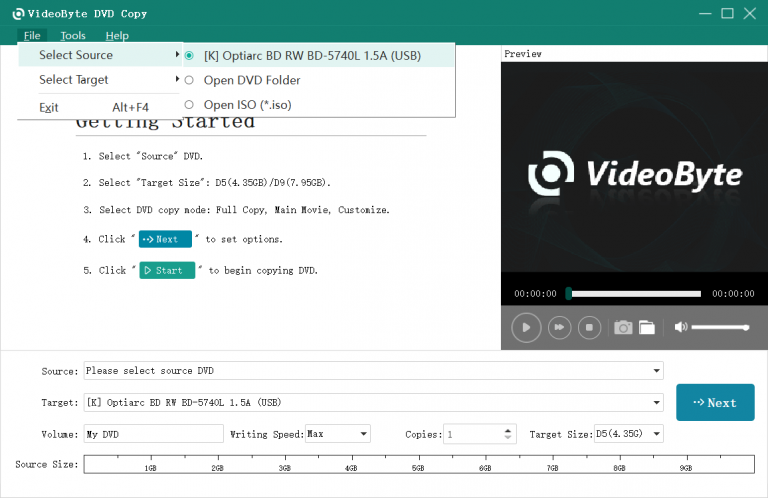
First of all, insert the DVD disc you want to copy into the disc drive on your Windows 7. Then Install and start VideoByte DVD Copy on your computer, and go to “File” > “Select Source” to load the source DVD.
Step 2: Choose Target & DVD Copy Mode
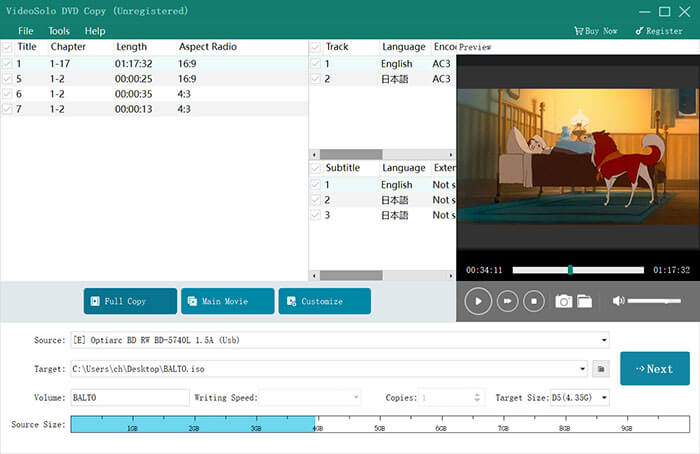
Choose “Target” to select the file format you want to output, you can choose “Save as ISO image files” or “Save as DVD folder”. You can also select DVD copy mode from “Full Copy”, “Main Movie” and “Customize”. Click on “Next” once done.
Step 3. Customize Output Options
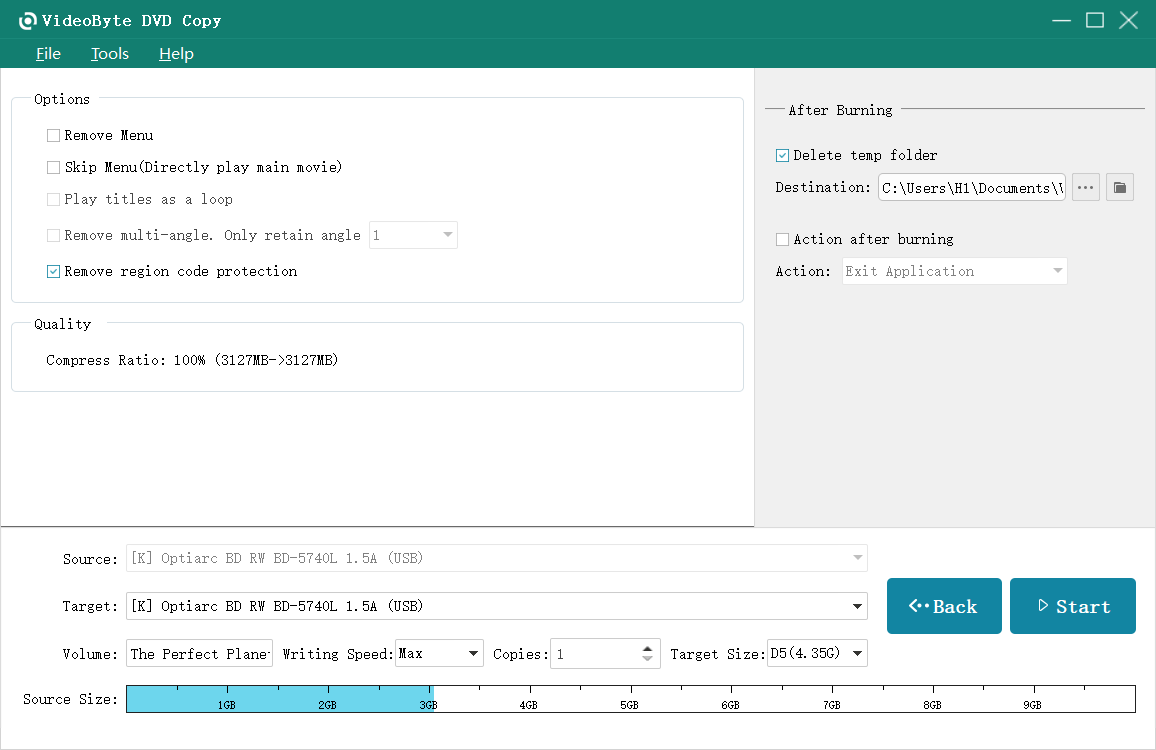
In this interface, you can set various output options according to your needs, such as “Remove Menu”, “Play titles as a loop”, “Remove multi-angle” etc.
Step 4. Back Up DVD to Windows 7
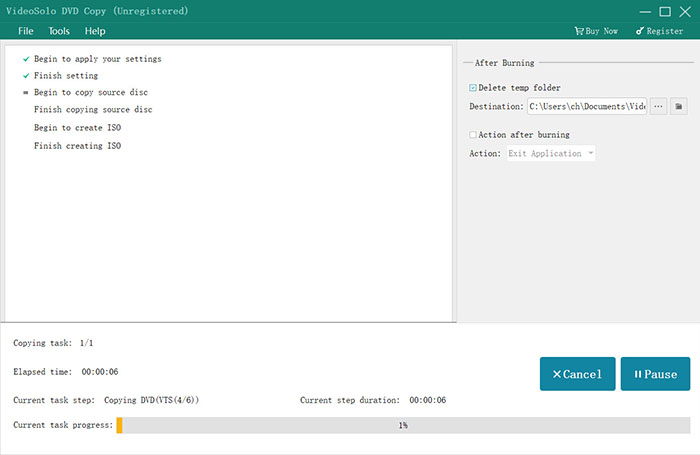
After setting all options, tap “Start” to begin the copying process. Wait patiently for a few minutes and you will get a lossless DVD backup on your Windows 7 computer.
Copy DVD in Windows 7 with Windows DVD Maker [Free Option]
As we said before, for DVDs without DRM protection, you can directly copy them to an external hard drive for backup because they are not copy-protected.
In this case, Windows DVD Maker is recommended to help you copy DVDs on Windows 7. This professional DVD copying tool is free software that comes pre-installed with Windows 7 and Windows Vista.
Here is how to use Windows DVD Maker to copy DVD on Windows 7.
Step 1. Launch Windows DVD Maker
On your Windows 7 computer click on the Start menu, search for Windows DVD Maker and then open the program.
Step 2. Add Contents
Add the DVD content you want to burn to the program by clicking the Add Item button at the top of the main interface.
Step 3. Select DVD Options
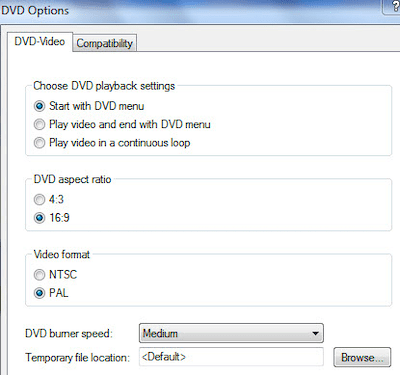
Click “Options” in the lower right corner to open the DVD Options window to select DVD parameters, playback settings and make other changes. Click “Next” to proceed.
Step 4. Customize DVD Menu
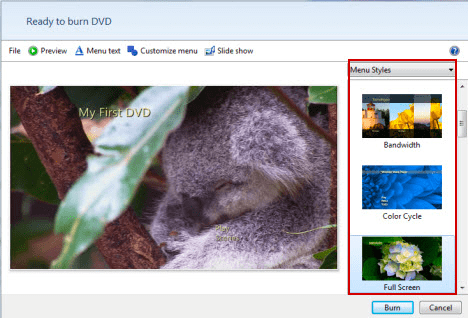
In the Ready to Burn DVD screen, you are free to set the menu text, customize the menu, and make other changes as you like.
Step 5. Start Burning DVD
Finally, click the Burn tab to start burning your DVD disc.
Windows DVD Maker is limited to burning computer-backed-up content to a new disc. If you want to directly copy the content of an original DVD to another disc, VideoByte DVD Copy is definitely your best choice. With this all-in-one professional DVD cloner, you can easily get it done.
FAQs of Copying a DVD on Windows 7
If you still have some puzzles on how to copy DVD on Windows 7, you can check the following FAQs and find the answers.
Q1. How to Copy DVDs on Windows 7/10 and Burn them with Built-in Features?
Windows 7/10 has a built-in feature called AutoPlay that helps users easily copy copyright-free DVDs such as homemade DVDs. Follow the steps below to get started:
- Insert the DVD you want to copy into the DVD drive, and then copy the video files from the DVD to a new folder.
- Replace the original DVD in the drive with a blank DVD.
- Click “Burn files to disc” when the Autoplay pop-up appears (or select the option from the dialog box in the notification center).
- Choose to use the disc Like a USB flash drive or With a CD/DVD player.
- Click “Next” to access the blank disc window, and move the video files from the folder into it.
- Click on “Manage” > “Finish burning” to start the burning process.
However, if you want to burn a copy-protected DVD, a professional third-party DVD-burning program is essential. VideoByte DVD Copy excels in this area and stands out from other similar software.
Q2. Can I Copy a DVD with Windows Media Player?
Windows Media Player does not offer a built-in feature to directly copy DVD to DVD. You have to copy the DVD files to your computer first, and then burn them onto another DVD using Windows Media Player.
Here’s a step-by-step guide to burning the backups from your computer to DVD with Windows Media Player:
- Insert a blank DVD into the DVD burner drive.
- Open Windows Media Player, go to Burn > Burn Option > Data CD/DVD, and select it.
- Select the backup files and add them to the “Burn list”.
- Click “Start burn” to initiate the burning process.
Q3. Is It Legal to Copy DVD to Computer?
The legality of copying DVDs to your computer depends on a variety of factors, including the jurisdiction in which you live and the purpose for which you are making the copy. In some cases, copying a DVD for personal use, such as creating a backup copy, may be considered fair use. However, it is important to note that it is usually illegal to copy and share a copyrighted DVD without the permission of the copyright owner.
Keep in mind that the methods shared in this article are intended for personal use only. Never use the copied DVD for commercial purposes.
Conclusion
To sum up, we have introduced 2 of the best methods for burning DVDs on Windows 7: using the professional third-party tool VideoByte DVD Copy and utilizing the built-in Windows DVD Maker. Both options offer convenient ways to copy and burn DVDs, catering to different user preferences and requirements.
For DVD lovers who need to preserve their copy-protected DVD collection and create backups effortlessly, we highly recommend VideoByte DVD Cop as the preferred choice. Its versatility, user-friendly interface, and ability to handle protected DVDs make it a reliable and efficient tool for all your DVD burning needs.


