Are you troubled by numerous DVDs when you cannot locate the targeted one accurately and quickly? Can some of your DVDs not be read by your computer like others? If you encounter these issues, it is time to resort to a DVD ripper for DVD ripping and decryption.
Handbrake is well-known as a free open-source DVD ripper. But do you know how to use Handbrake to rip a DVD? This article will give you a detailed guide to ripping DVDs with Handbrake, reasons and solutions for Handbrake malfunction, and an excellent alternative - VideoByte BD-DVD Ripper.

There is no doubt that you need to install the Handbrake itself. Additionally, if your DVDs are copy-protected, you should install libdvdcss, a tool for unlocking region restrictions and CSS.
Step 1. Install Handbrake DVD ripper.
HandBrake is a totally free DVD ripper. The current version, 1.9.0, supports Windows (10 and later), Mac (macOS 10.13 and later), and Linux. If your system is compatible, you can download Handbrake from its website. If you need the old versions, they are also provided on its official website. (You can click here to get them.)
Step 2. Install libdvdcss if you want to use HandBrake to rip copy-protected DVDs.
HandBrake itself can't decrypt commercially copy-protected DVDs, which make up the majority of DVDs. If you want to rip protected DVDs with Handbrake, install libdvdcss first. Download libdvdcss and click here.
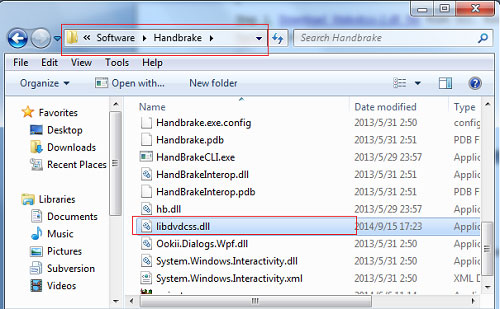
You will find there are versions from 0.0.1 to 1.4.2. If your system is Windows or Mac, you can choose the 1.2.12 version, which contains macosx/, win32/, and win64/.
On the Windows system
Click win32/ or win64/, and you can download libdvdcss-2.dll. Then, copy it to the HandBrake folder.
On the Mac system
The security protocols on macOS prevent you from installing the library file using an installer. Fortunately, using Terminal and a package manager - Homebrew can solve it.
1. Install Homebrew if you don't have it.
Firstly, open the Terminal application on your Mac. Then, paste the command in the parentheses to install Homebrew (/bin/bash -c '$(curl -fsSL https://raw.githubusercontent.com/Homebrew/install/HEAD/install.sh)'). Thirdly, follow the on-screen instructions to complete the installation.
2. Install libdvdcss.
In the Terminal, run the following command: brew install libdvdcss and wait for the installation to be completed.
In principle, using Handbrake to rip DVDs on Windows and Mac is similar. So, I will take the steps of the Windows system as an example to teach you step by step how to decrypt and rip DVDs using Handbrake.
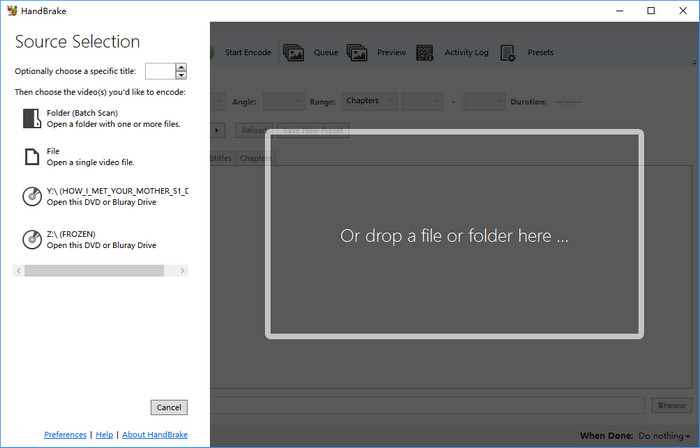
Step 1. Load the targeted DVD to Handbrake.
Insert your DVD into the computer's DVD drive. Next, launch HandBrake and choose your DVD drive in Source Selection, where your DVD is detected. Wait for the process of scanning your DVD's titles.
You can also rip DVD folders and ISO files with Handbrake
Step 2. Choose the needed DVD titles and chapters
HandBrake will automatically select a title. You can go to the Title drop-down menu to change to another DVD title and choose chapters of the selected title.
Step 3. Preset output format, quality and path.
Format: Handbrake supports three output formats - MP4, MKV and WebM.
Quality: Click 'Presets' > 'General' on the right side of the Handbrake interface to select the output quality.
Among the choices, 'Fast' and 'Very Fast' mean that your output will be low quality with a small size, while 'HQ' and 'Super HQ' make exported videos with higher quality but more space occupation.
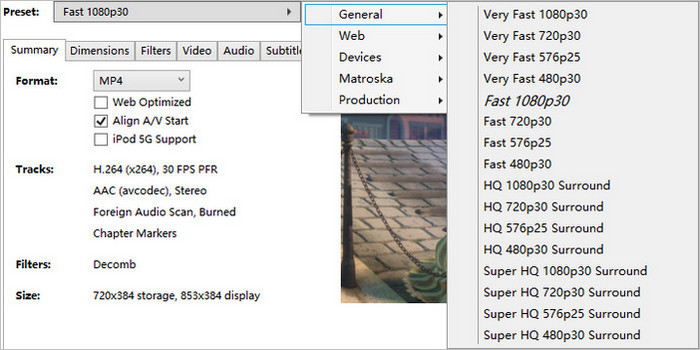
Don't choose 720p and 1080p presets for DVDs. Because PAL DVD's resolution is 576p, and NTSC DVD's resolution is 480p. Rip DVD to 720p and 1080p won't make the videos look better but occupy more storage space.
Path: Go to "Save As" > "Browse" to choose the saving path for the output files. You can rip DVD with Handbrake to computer hard drive or external storage devices.

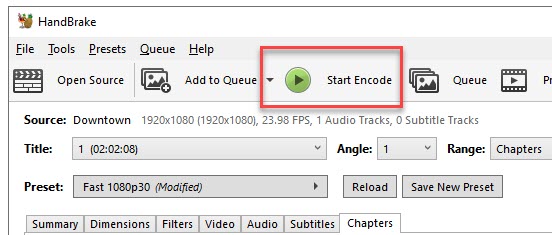
Step 4. Start to rip DVD with Handbrake.
Tap "Start Encode" on the top menu if everything has been set over. The green ripping process is visible at the left bottom corner.
If you intend to learn more methods of saving DVDs on Mac, you can click to read this article.
Sometimes, using the Handbrake fails to rip DVD. The possible conditions are as follows:
• There is no valid source or title.
• HandBrake rips part of the DVD, not the whole.
• DVD videos are distorted after ripping DVD with Handbrake.
The reasons for these symptoms may include damaged or dirty DVDs, a bad sector, high CPU usage, unsupported subtitles, etc. However, rip failure is most probably caused by the fact that Handbrake cannot decrypt the copy protection of your DVD.
To fix these issues, you can check these items one by one:
• Whether your DVD is damaged or outdated.
• Whether you enable third-party software in the background causes high CPU usage and affects Handbrake's work.
• If your computer is old, change to the Handbrake hardware encoder for the DVD ripping.
• Under the Subtitles tab, try to disable subtitles.
If Handbrake still won't work well after the mentioned ways, that means your DVD has more complex situations, like high-level copy protections or region restrictions. In this case, Handbrake cannot be capable of ripping your DVD, so you need a powerful alternative to help you.
Among various DVD Rippers, I recommend the best DVD Ripper - VideoByte BD-DVD Ripper, which is compatible with both Windows and Mac systems. With no need to download libdvdcss or any other additional tools, it can bypass commercial protections, including APS, CSS, ARccOS, CPRM, AACS, BD+, Cinavia and region restrictions efficiently.
Key features of VideoByte BD-DVD Ripper
3 steps to rip DVD with VideoByte BD-DVD Ripper
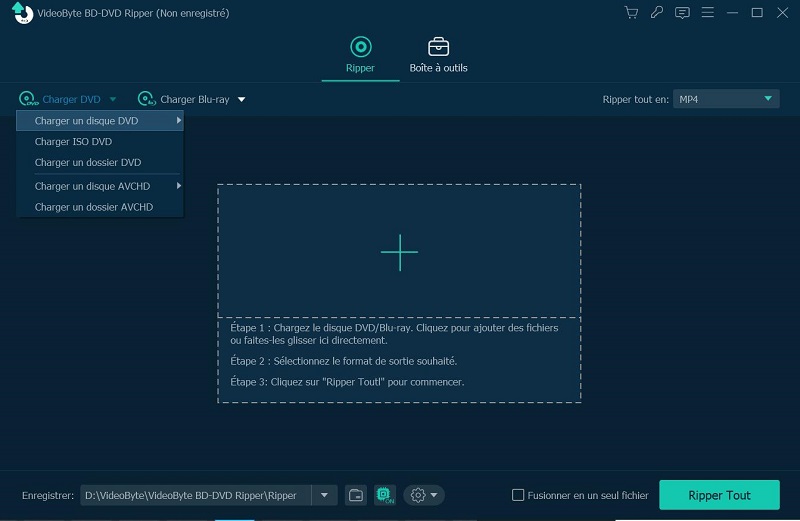
Step 1.Load your DVD to VideoByte BD-DVD Ripper.
Connect the drive to the computer and insert the DVD disc into the drive first. Then, click on the “Load DVD” button and select the drive which includes the DVD or Blu-ray movie disc.
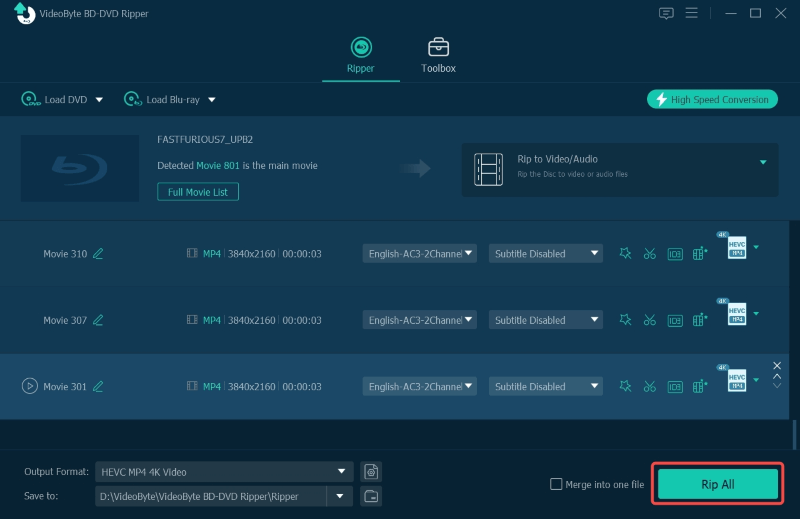
Step 2.Choose the output path and format.
Click the “Rip All to” button at the upper right corner and select your desired output format from the pop-up list. Go to the “Save to” section at the lower left corner to change the destination folder where you save the ripped DVD movies.

Step 3.Click "Rip All" to start ripping your DVD.
To sum up, we have introduced two ways for you to rip DVDs. You can use Handbrake to rip DVD as the above steps. But sometimes, it won't succeed in ripping DVDs with Handbrake due to its inability to decrypt some copy protections. Therefore, I strongly recommend you try VideoByte BD-DVD Ripper, which has a 30-day free trial. Make your DVD ripping quickly with VideoByte BD-DVD Ripper!
Hot Articles
by in 29 December, 2024
by in 24 December, 2024
by in 23 December, 2024