DivX and Xvid are two popular formats that are able to maintain lossless quality and ensure the best video playback experience to users. However, when you want to play DivX/Xvid videos on larger screens like your TVs at home, it can be frustrating when your devices can’t support playing DivX. Under this situation, you will need to burn DivX to DVD to solve the problem.
So in this article, there will introduce 2 methods to help you burn DivX to DVD just by easy steps. Now, keep reading and see how to burn DivX to DVD with DivX DVD burner for having a more enjoyable video playback experience on TVs and other large-screen devices!
What are DivX and XviD
Before going to the tutorials on converting DivX to DVD, you can learn about the definitions of the format and the differences between DivX and XviD first.
1. Brief Introduction for DivX
DivX is a brand of video codec products developed by DivX, LLC. The DivX codec is famous for its ability to compress lengthy video segments into small sizes but still maintaining relatively high visual quality.
There are three DivX codecs; the original MPEG-4 Part 2 DivX codec, the H.264/MPEG-4 AVC DivX Plus HD codec and the High efficiency Video Coding DivX HEVC Ultra HD codec.
2. Brief Introduction for XviD
XviD is a video codec library following the MPEG-4 video coding standard, specifically MPEG-4 Part 2 Advanced Simple Profile (ASP).
XviD is a primary competitor of the DivX Pro Codec. XviD not only is available for a limited number of platforms but also can be used on all platforms and operating systems for which the source code can be compiled.
Best DivX DVD Burner: Convert and Burn DivX to DVD
To burn DivX to DVD, you must do certain preparations, like getting a reliable DivX DVD burner ready to help. Here, VideoByte DVD Creator is a top-ranking one that I want to recommend to you.
VideoByte DVD Creator can well support videos of the most popular formats, including DivX/XviD, letting you burn a DivX discs of all types with lossless quality. Also equipped with the easy-to-use video editor and DVD menu creator, you can adjust video settings and create a DivX menu for the DVD discs you are going to create to make it special. As VideoByte DVD Creator offers very user-friendly UI, it can be easy for every new users to control even you haven’t tried it before!
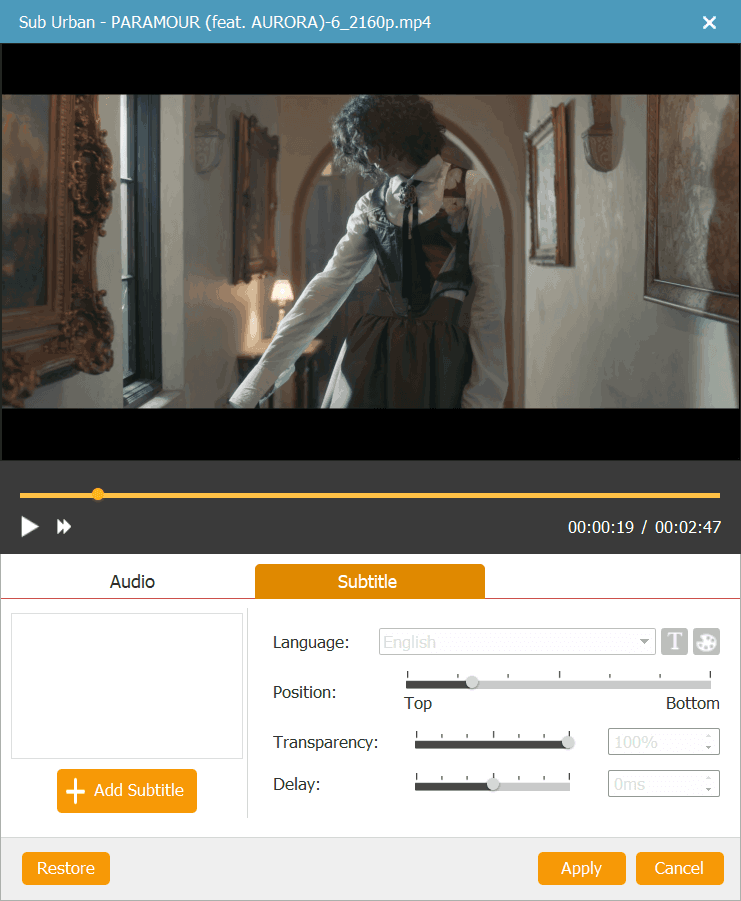
After importing videos to the software, you can use its built-in video editor to adjust video effects, add subtitles, audio tracks, and even customize menu themes before proceeding with the disc burning.
Key Features of VideoByte DVD Creator
- Supports burning a wide range of video formats in high quality (720P, 1080P, 4K) and even 3D
- Supports the most-commonly used disc types like DVD-5, DVD-9, BD-25 and BD-50 to burn videos to
- Adds audio tracks and subtitles to the discs as you want
- Offers in-built video editor to adjust videos and create DivX menus to make wedding DVDs or other themes easily by clicks
- Manages disc chapters like merging and splitting freely
- Provides rapid speed to burn DivX/XviD videos to DVD/Blu-ray/ISO formats quickly without wasting time
Now, the following tutorial will show you how to burn DivX to DVD with high quality using VideoByte DVD Creator.
Step 1. Download VideoByte DVD Creator
Before copying DivX to DVD, you need to download and well install VideoByte DVD Creator first. VideoByte DVD Creator offers a free trial to let you try its burning function without any cost. Just click the download button below according to the computer system you are using to install it.
Step 2. Add DivX/XviD Videos
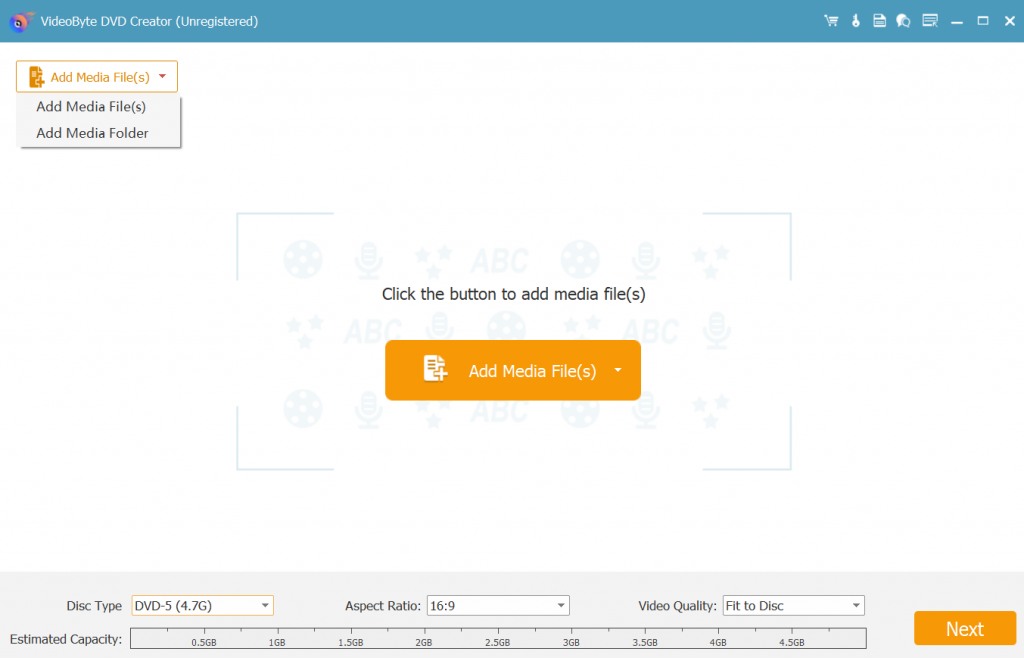
In the main interface, you can find two “Add Media File(s)” icons at the middle interface and upper-left corner, just click one of them to add DivX/XviD videos to the program.
Step 3. Edit DivX/XviD Videos (Optional)
Though editing DivX/XviD Videos is an optional step, it is kind of important as you can add some visual effect to your videos. Then how to edit videos? Simple! Click “Magic Stick” icon on the right side of videos that you want to edit.
Then you will find six editing options in the pop-up window: Rotating the videos, trimming the video length, cropping the video, adjusting brightness, saturation, contrast or hue settings and adding watermark. When you finish editing, click “Apply” button to save the changes.

Besides, if you want to add an audio track, you need to click “Audio” button and select “Add & Edit Audio”, then add an audio track, change language and adjust volume in the “Audio” section. To add subtitle, you can edit subtitles in the “Subtitle” section.
Step 4. Customize DivX DVD Menu (Optional)
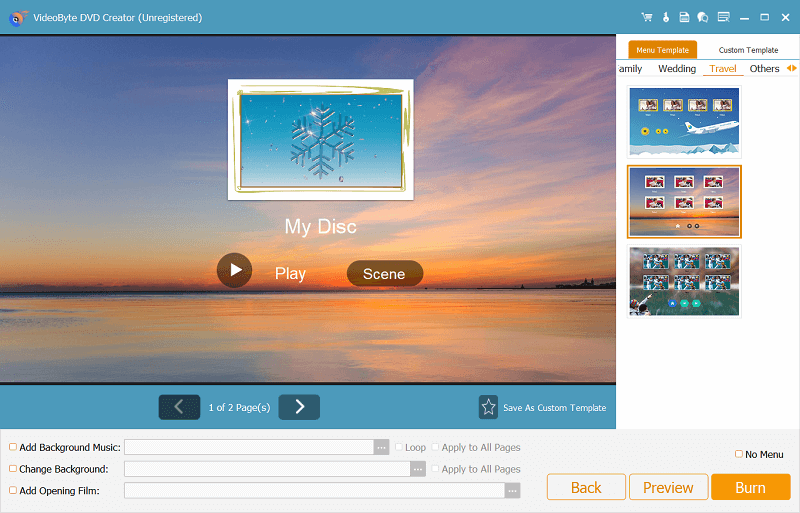
After editing videos, click “Next” and then you will find different menu templates. Customizing DVD menu is also an optional step but can make your DVD more special. To add DVD menu, you need to select one theme as your DVD menu, or if you are not satisfied with these menus, you can download more menu templates.
Step 5. Start to Burn DivX to DVD
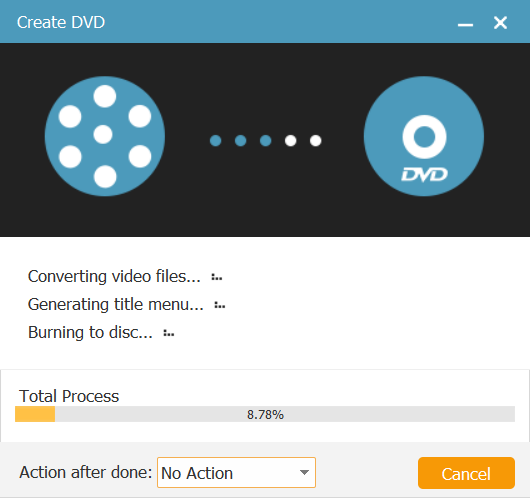
At last, you just need to click “Start” to burn videos to DVD and wait a few minutes. When the conversion is completed, you will see a pop-up window, click “OK” icon. Then you can enjoy watching DivX/XviD videos on any standard DVD player. Remember that a blank disc is needed before conversion.
You May Also Need:
How to Convert DivX to DVD with Open Souce Software
Except for VideoByte DVD Creator, another DviX DVD burner you can trust to convert DivX to DVD is DVD Flick. This software is completely free to use, so you don’t need to cost any fee but simply they DivX videos burned to DVD discs just by clicks.
Although the software has not been enhanced for a long while since 2009, and its provided templates as well as menus can be a little outdated, its easy-to-use functions are still helpful if you what to copy DivX to DVD with good quality. But still, if you want more advanced editing features to better adjust the videos or create DivX menus, VideoByte DVD Creator can better help.
How to Burn DivX to DVD with DVD Flick
Because DVD Flick only supports old Windows systems such as Windows 7/XP/Vista/2000, for Mac users or those who are using the latest systems, this software is not suitable. If you are using the mentioned Windows systems, for sure DVD Flick is a good and free option to burn DivX to DVD. Now you can also see how it works to help.
Step 1. When you have installed DVD Flick on your computer, open the software and then insert a blank DVD disc to the device to let the software detect it.
Step 2. Then you should import the DivX or XvidD videos to the software. Directly drop them to the interface and the videos can be added immediately.
Step 3. Now, click “Project Settings” on the top menu bar and you can preset some burning settings before copying DivX to DVD in DVD Flick. For example, you can adjust the quality settings such as bit rate, channel, etc or choose the format you like to keep the videos in the DVD disc later.
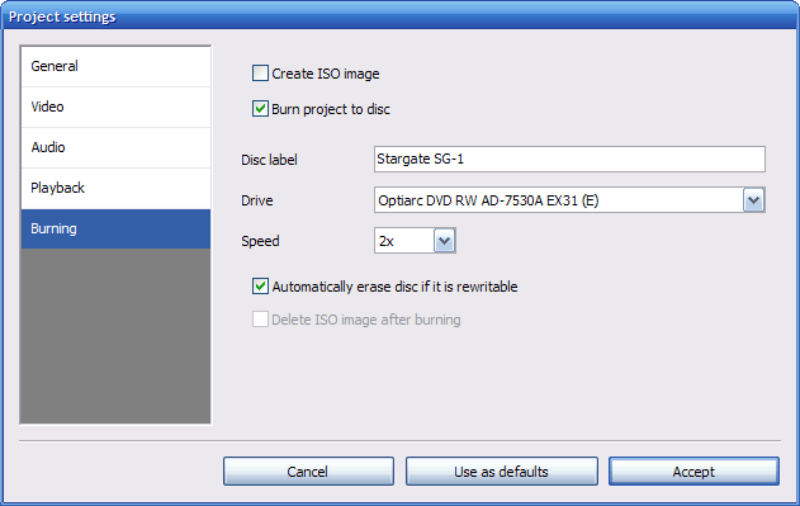
Step 4. After this, you can continue to create DivX menus for the DVD disc with the provided templates in DVD Flick. Although they are not designed in modern ways (didn’t have an update for a long time), some of them can still be used.
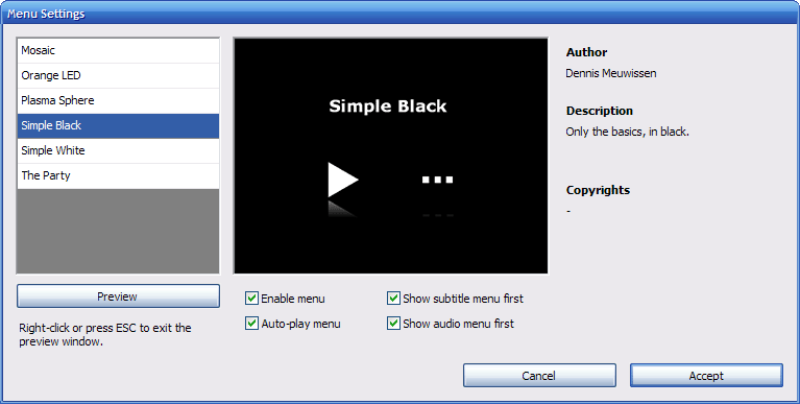
Step 5. Finally, when the DVD menu is also set, you can click the “Create DVD” button to start converting DivX to DVD immediately. DVD Flick will do the rest and copy DivX to DVD for you automatically.
FAQs About DivX to DVD
How to Play DivX/XviD Videos
You need to know that not all DVD players support playing DivX/XviD videos directly. Only those with the codec designed inside can detect the videos and play them. Here are 3 tips provided for you to play DivX/XviD videos on computers directly without copying to DVD discs:
- If you want to play DivX or XviD videos on PC, then you need to download a media player with built-in support for DivX/XviD video files such as VLC Media Player first.
- You can also download and install DivX codecs or the XviD codecs, then you can be able to play the videos with Windows Media Player.
- If you don’t want to download VLC Media Player or install codecs, then you can convert DivX and XviD videos to DVD so that you can watch on a DVD player or PC with DVD-ROM.
Can I Burm Many Videos in Various Formats, such as DivX, Xvid, MP4, etc., to the Same DVD?
This would be based on whether the DVD burner you select to burn videos to DVD discs supporting all these formats. For VideoByte DVD Creator, which supports almost all popular video formats, you are surely able to burn all videos of different formats to the same DVD disc at once!
Conclusion
The completed guide for copying DivX and XviD to DVD is shown as above. For computers installed with the latest Windows and Mac systems, VideoByte DVD Creator is surely the most professional DivX DVD Burner that can help.
But if you are using an old Windows computer and want a free way to convert DivX to DVD, then DVD Flick is also a good choice to save your cost. Now, based on your needs and choose the appropriate way to burn DivX to DVD for playing the videos on more devices flexibly!


