Most new models of Mac, such as the MacBook Air and MacBook Pro with Retina, no longer come equipped with a disc drive. If you have a collection of classic movie DVDs, you may be wondering how to watch them on your Mac.
One solution is to purchase an external DVD drive. However, bringing an additional accessory with you can be inconvenient. Thus, you may want to know how to rip DVDs to your Mac. This article provides practical solutions for Mac/Macbook users on how to rip DVDs. If you need trustworthy Mac DVD-ripping software, you've come to the right spot.
Rip Unprotected DVD on Mac with Built-in Disk Utility
Although most commercial DVDs are protected by measures like DRM, if the DVD you want to rip is unprotected, you can use the Disk Utility on macOS to get a digital copy.
Before conversion, you need to prepare an optical drive that can read your DVD. Connect it to your Mac, then follow the steps below.
Step 1. Find and open Disk Utility [Applications > Utilities > Disk Utility] on your Mac computer.
Step 2. Locate and click on your DVD. Tap "File" on the upper left navigation bar. Choose "New image," then "Image from [disc title]".
Step 3. A pop-up window will appear. Choose Format as "read only" and Encryption as "none", and then click "Save."
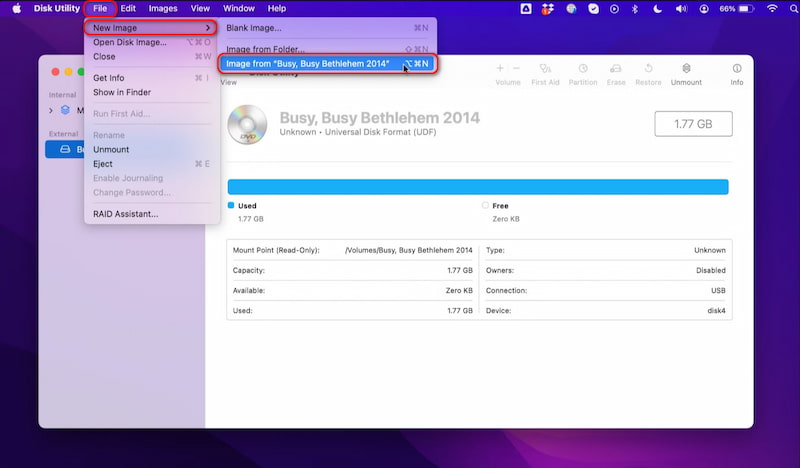
Wait for some time, and you will get a ripped .dmg file of your DVD videos on your Mac computer. Then, you can play the .dmg file with VLC or other DVD players like VideoByte Blu-ray Player.
Rip Protected DVD on Mac with Professional Mac DVD Ripper
One thing you should note is that Disk Utility can only rip unprotected DVDs on Mac. It falls short when faced with commercial DVDs with protection. Therefore, if you want to rip a protected DVD, you need a professional Mac DVD ripper that can bypass these protections.
Here, we introduce the best Mac DVD Ripper to you: VideoByte BD-DVD Ripper. It supports burning a DVD on Mac to more than 300 mainstream video formats like MP4 and MKV. Besides, VideoByte BD-DVD ripper provides a video enhancer for improving your video quality as well as a video editor to personalize videos with only a few clicks. Apart from DVDs, it can also help you rip Blu-rays on your Mac computer.
Key Features of VideoByte BD-DVD Ripper:
- Removes copy protections and supports ripping DVDs on Mac to MP4/MKV/MOV or extracting the DVD audio to MP3 and other common open-source files.
- Keeps the original quality, while delivering the fastest DVD ripping speed.
- Supports converting DVDs to other devices, including almost all smartphones.
- Provides a built-in video enhancer and a video editor for further customizing your DVD content.
How to Rip a DVD on a Mac with VideoByte BD-DVD Ripper:
For preparation, get an external DVD drive, DVDs you want to rip, and a MacBook.
Download the new version of VideoByte BD-DVD Ripper to your Mac, launch it, and follow the steps below to rip your DVD movies to Macs with ease.
Step 1. Load DVDs/Blu-ray DVDs into the DVD Ripper
Put your DVD disc into the DVD drive and click the "+" in the center of the program to begin uploading files.
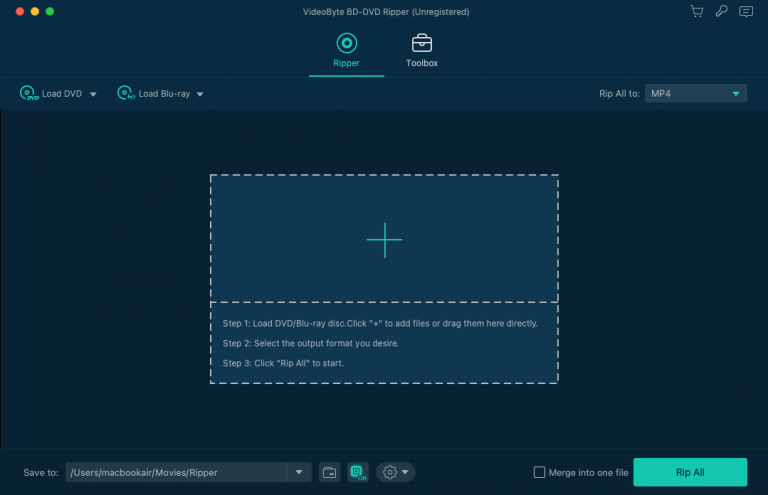
Step 2. Select Output Video Format
Choose an output format before you start to convert it. Click the drop-down list of the "Rip All to" and go to the "Video" category. Scroll down and select the video format you want. Or you can directly search the format in the search box at the bottom left.
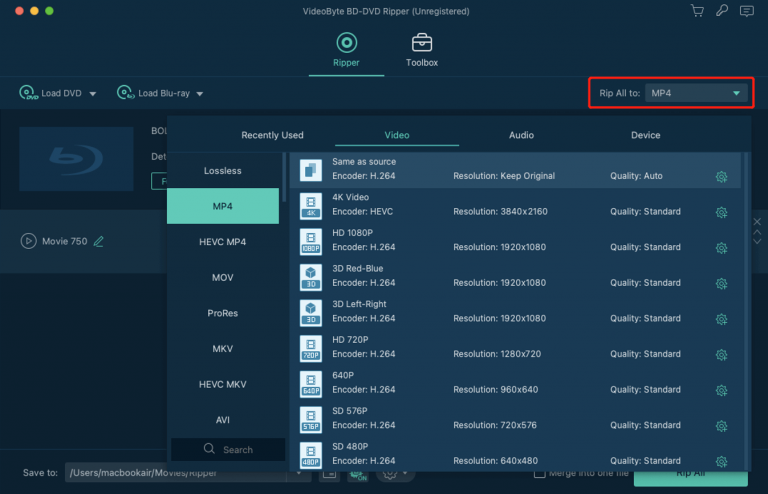
Step 3. Confirm Other Output Parameters and Settings
You can change the default destination folder by clicking the "Save to" at the bottom to reset the destination folder. Also, you can tune other parameters according to your needs.
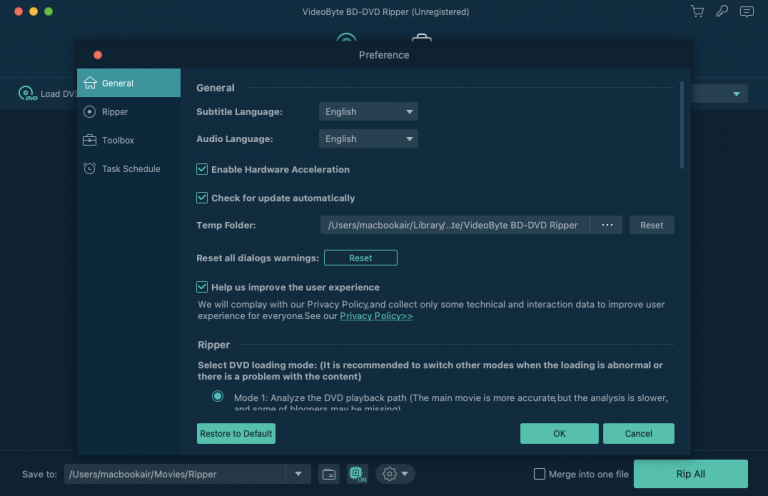
Step 4. Start to Rip DVDs to Mac
When you're satisfied with all settings, click the "Rip All" button on the main interface to start ripping your DVD to Mac.
You can choose to rip DVDs to MOV format files as it is the default format of QuickTime Player on Macs. But you are also recommended to convert the DVDs to open-source MP4 files for they are compatible with most devices.
Rip DVD to Mac Free with VLC
As you may already know, VLC Player is a powerful open-source free media player. But what you may not know is that it can also help you rip DVD videos on Mac. With VLC Media Player, you can easily rip a DVD to H.264, H.265, MPEG-1/2, MPEG-4, WMV, DIVX, H.263, VP8, MJPEG, Theora, and Dirac. How to rip a DVD with VLC? Download and install VLC Player, and launch it. Connect the external DVD drive to your Mac, and insert the DVD into it. Then, check the following simple guidelines:
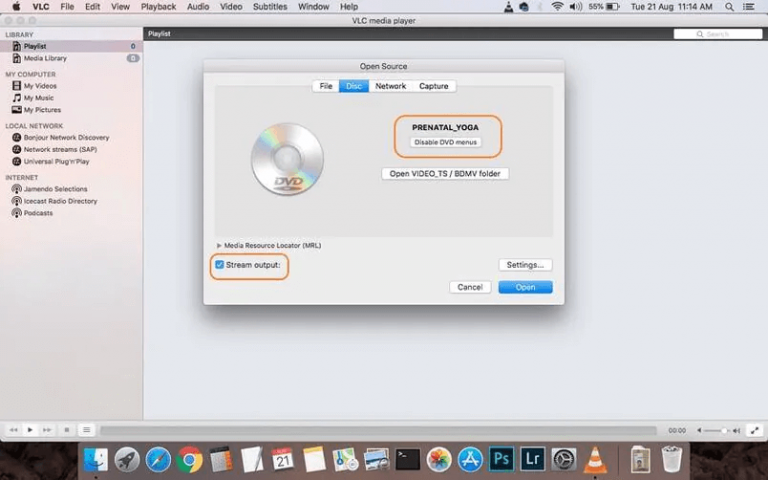
Step 1. Open VLC Player, choose "File" and then "Open Disc".
Step 2. From the pop-up "Open Source" window, go to the "Disc" tab. VLC will automatically detect your inserted DVD. Now you need to turn on both the "Disable DVD Menus" and "Stream Output" buttons.
Step 3. Click the "Settings" button to choose the output format you need from the "Encapsulation Method" option.
Step 4. After confirming all settings, click the "Open" button, and VLC will start to copy the DVD videos on your Mac.
VLC Player as a DVD ripper is not available for DVDs with some latest copy protections. If you want to rip encrypted commercial DVDs, we still recommend you try VideoByte BD-DVD Ripper.
Bonus: How to Copy DVD Content to Mac or Another Blank Disc
Ripping DVDs to Mac means you convert the DVD content to files in other formats. But sometimes you may want to copy the content from an original DVD disc to another blank disc. This happens when you borrow a game from your friend, and you want to continue to play it after you return the Game Disc. Then you need to copy the disc to another blank disc.
There is also software for copying DVD content to Mac. We recommend you try the VideoByte DVD Copy, for it can copy your DVD content with 1:1 original quality in just a few steps.
It supports 3 copy modes:
- Copy a DVD to another DVD disc.
- Back up the DVD to your hard drive on Mac as a Video_TS folder or ISO image file.
- Burn ISO image DVD Folder to DVD.
A simple guide to copying DVD content to Mac or another blank disc:
Download, install, and then launch the VideoByte DVD Copy, then follow the instructions as follows:
Step 1. Load the DVD disc. Click on "File" and then "Select Source" to load your DVD disc, ISO image file or DVD folder. Or directly click to expand the "Source" pull-down menu to choose your inserted DVD disc.
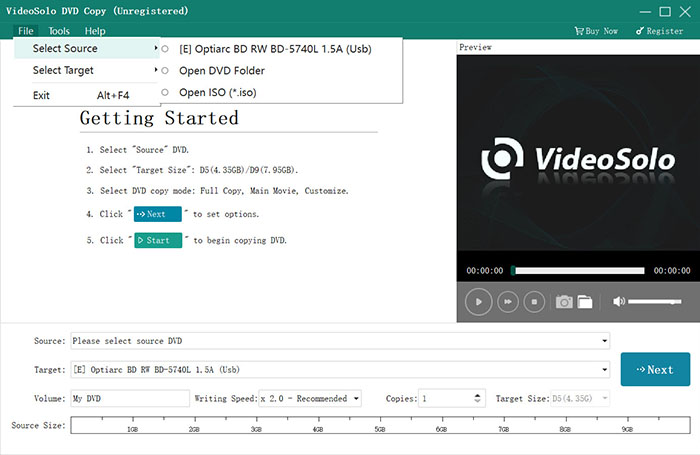
Step 2. Confirm the "Target" file format. Choose the blank DVD disc if you want to copy a DVD to another disc.
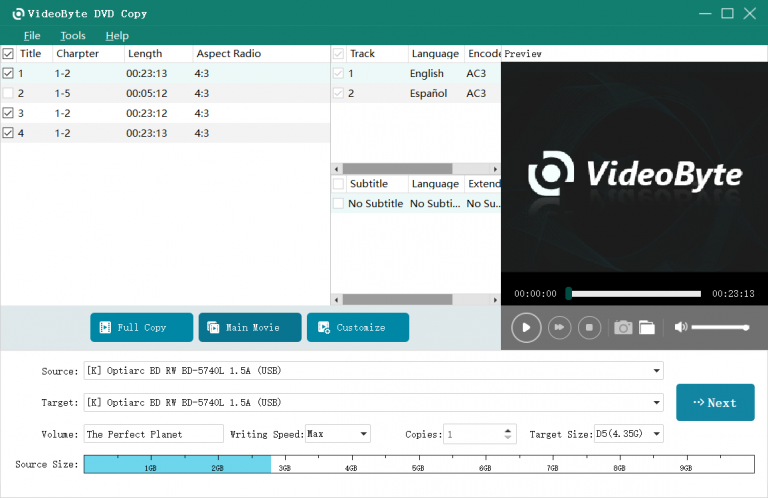
Step 3. Choose DVD copy mode from "Full Copy", "Main Movie", and "Customize".
Step 4. Decide output options. You can choose to "Remove Menu" or "Skip Menu" here.
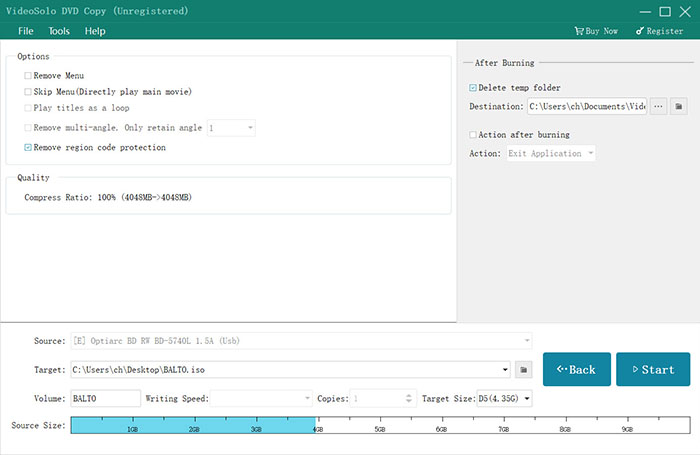
Step 5. Click "Start" to copy the DVD.
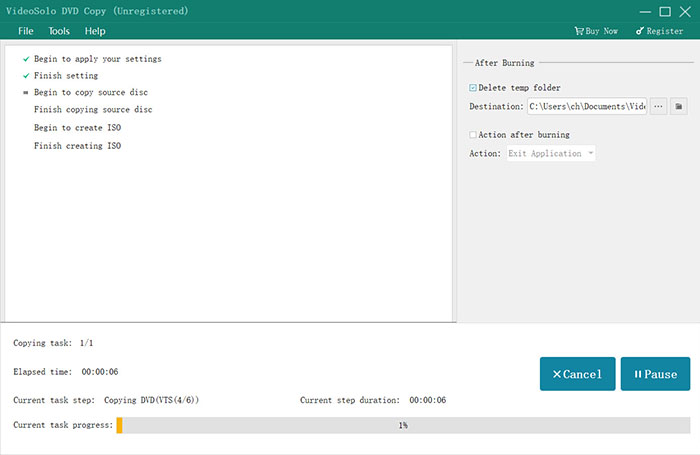
If you have 2 disc drives and are able to connect them both to your Mac, you can directly insert the original DVD disc into one drive and the blank disc into the other. If you only have 1 disc drive, you need to first copy them as the ISO image file, then burn the created ISO image file to the blank DVD disc.
FAQs of Ripping DVDs on Mac
Can I rip a DVD to Mac online?
Currently, there are no online DVDs to Mac rippers. That's because DVD ripping can be complicated and needs to consume high CPU to complete the process. It can't be held on a web page. If you are worrying about the space on your Mac, you can try the VideoByte BD-DVD Ripper because it only takes up relatively small space.
Can I rip a DVD on Mac with multiple episodes?
Yes. If your DVD contains a whole TV series with multiple episodes, you can use VideoByte BD-DVD Ripper to rip them to Mac. You can even select which episodes to be ripped. All ripped episodes will be output in separate video files.
Is it possible to rip audio from DVDs?
Yes. We understand that sometimes you only want to extract the audio track from a DVD. With the help of the VideoByte BD-DVD Ripper, you can extract the disc audio to MP3, AAC, M4A, etc, while keeping the original sound quality.
How long will it take to download a DVD video on a Mac?
It depends on the ripping tool you choose to use. Ripping a DVD to a Mac via VLC may take some time. But with VideoByte BD-DVD Ripper, you can enjoy a fast ripping speed because it supports up to 6X faster ripping speed to boost efficiency.
Conclusion
This article provides easy yet practical solutions for those who don't know how to rip a DVD on a Mac. If you are looking for a DVD to MP4 Ripper on Mac, try the user-friendly VideoByte BD-DVD Ripper. It removes copy protections from DVDs and rips them into files with commonly used video formats.
This ultimate DVD ripper allows you to finish the ripping process in just a few steps and further customize the DVD content with VideoByte BD-DVD Ripper's built-in video enhancer and video editor. Free download and have a try.


