You can store your media in numerous ways, such as local hard drives and cloud storage. For the DVDs you own, you can also copy them to computer, to manage them well and to save space. However, as the most-used Windows OS for PC, Windows 10 doesn’t provide you the tool to copy those protected DVD to other places directly. But don’t worry, this article will offer you a full guide to using a third-party program to freely copy DVDs in Windows 10.
Method 1. Copy DVD to Windows 10 Computer/Hard Drive/USB for DVD Backup
In general, you can just insert your DVDs and copy them directly to your computer, or to an external hard drive. But if you have commercial film and television DVDs, they may be subject to DRM protection from copyright owners, or regional restrictions, which means that you need to use other tools for copying DVD.
How can you make it possible? We recommend you to use a professional DVD ripping program, VideoByte DVD Copy. It is a very powerful and lightweight DVD copier designed to meet the needs of removing DRM protections from DVDs and making backups. Not just Windows 10, VideoByte DVD Copy can also be used to copy DVD in Windows 7/8 or Mac, and more major computer systems.
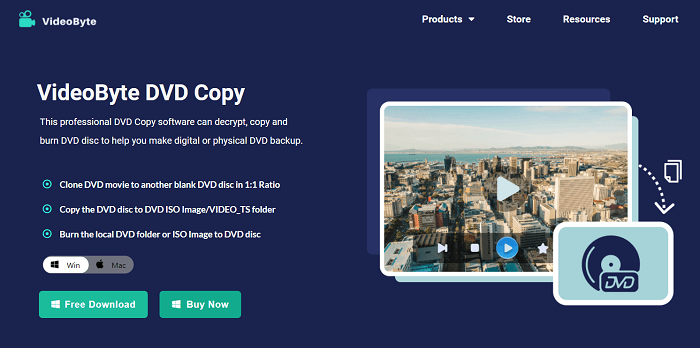
More key features of VideoByte DVD Copy:
- Fast Copying Speed: VideoByte DVD Copy uses the latest technology to provide the fastest DVD copy speed, saving you time during the copy process.
- User-friendly: VideoByte DVD Copy provides three DVD copy modes in its intuitive UI. They support copying DVD to various data storage devices and cloning the original DVD to another DVD, all without quality loss.
- Selectable Output Formats: Support for a variety of output formats, including VIDEO_TS, ISO Image, and direct copy to blank disc.
- Direct Preview: VideoByte DVD Copy has a built-in DVD player that enables you to preview the detailed information of your DVD such as the titles, chapters, audio track, and subtitles.
Before you proceed with the guide, you will need the following hardware and software.
- A computer running Windows 10 and above
- A relatively modern CPU with iGPU or dGPU (anything after 2014 is recommended for a smooth user experience)
- Enoughdisk space (no less than 4GB)
Here are the steps for Windows copying DVD.
Step 1. Select File Source
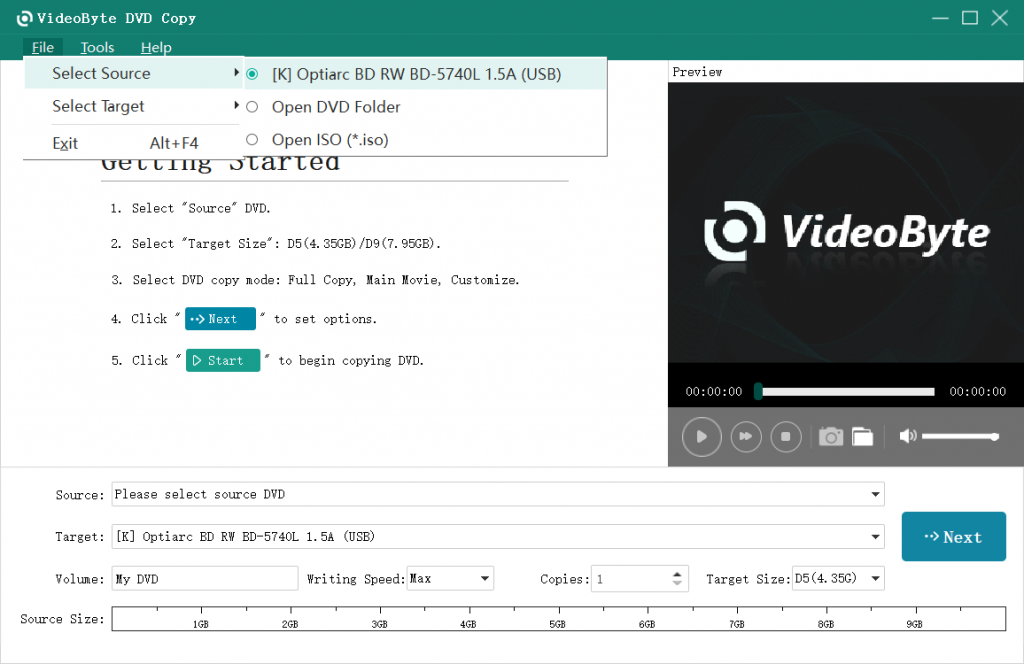
To copy DVD in Windows 10, you need to connect your DVD drive to the computer, then insert the original DVD. Launch VideoByte DVD copy and select the DVD to duplicate by going to “File > Select Source“.
Step 2. Select Copy Mode
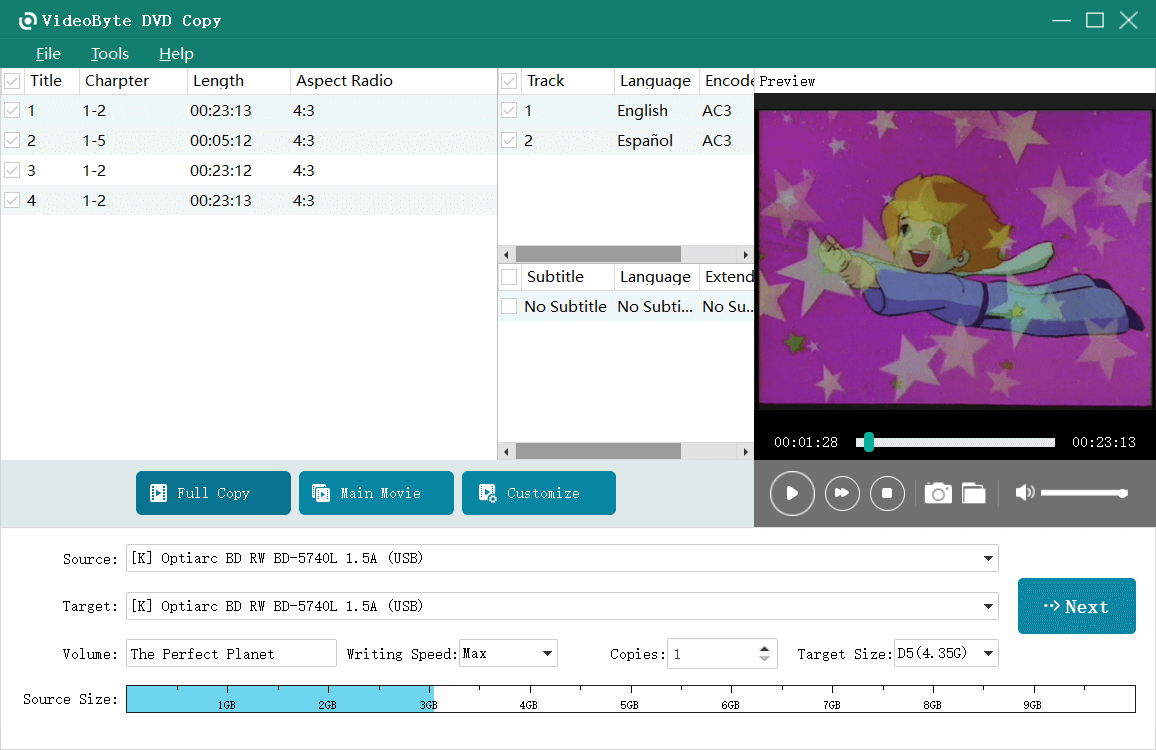
Then after VideoByte DVD Copy is done loading the DVD’s content, it will automatically enter “Full Copy” mode and be ready to begin copying DVD to computer. There are multiple options you can optimize the content you wish to copy. Click the “Main Movie” or “Customize” to customize the length of the movie. Moreover, you can select the Language Track or Subtitle you want to copy.
Step 3. Set Output Options
After personalizing all the content you want to copy, open the “Target” drop-down menu and choose “Save as ISO” or “Save as DVD Folder“, depending on your needs. Then in the popped-up windows, you can choose your output location, whether it be your computer, hard drive, or USB drive. Besides the output location, you can also modify the target size and the name of your ISO. Click “Next” to proceed.
Step 4. Customize Copy Contents and Start Burning
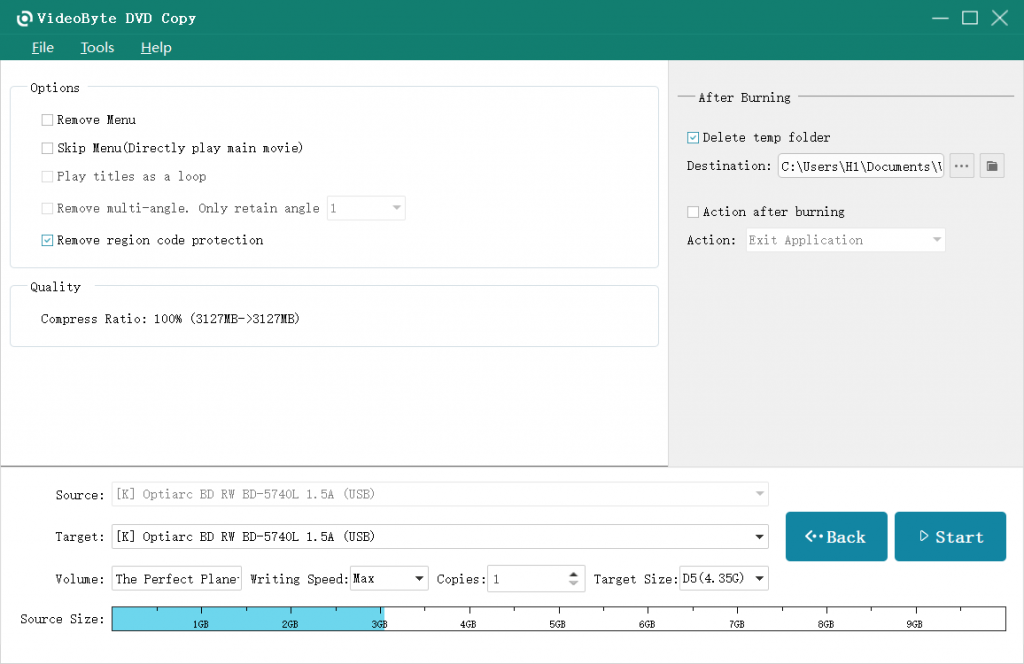
On the next page, in the “Options” section, you have the choice of “Remove Menu“, “Skip Menu“, “Play titles as a loop“, “Remove multi-angle“, and “Remove region code protection“. Additionally, by default, your copying will not lose any data throughout the copying phase. Click “Start” to begin the copying process.
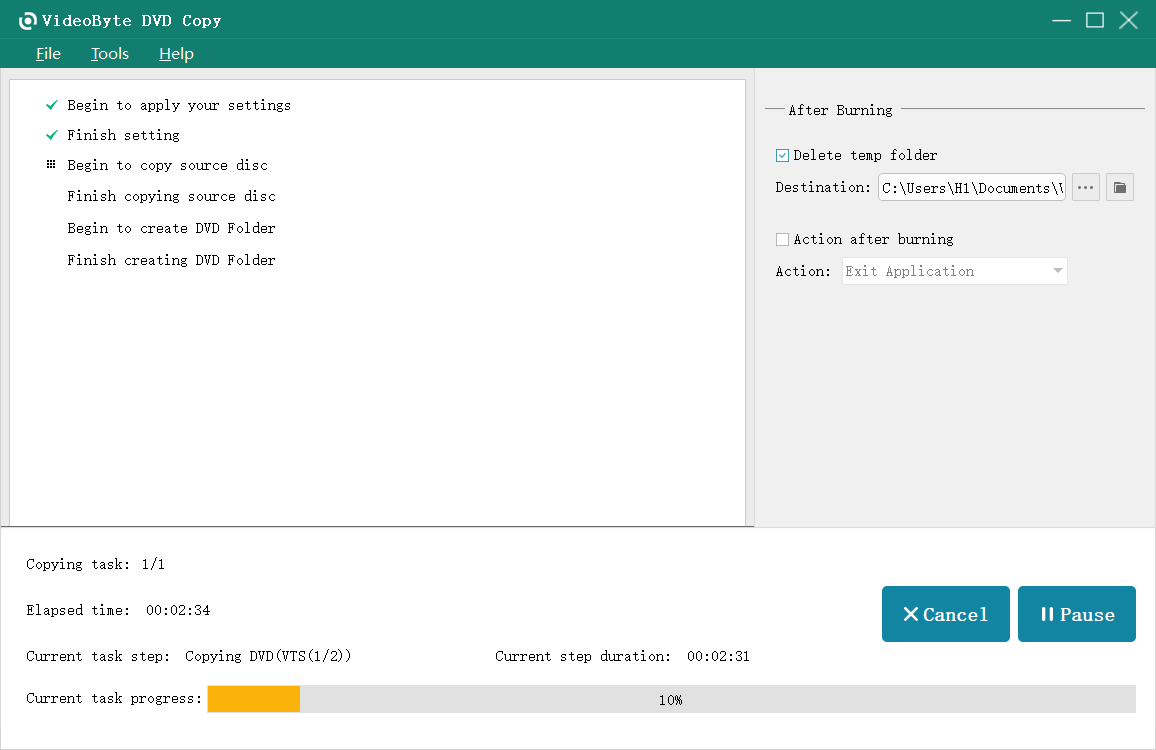
After copying DVD to your computer, you can then insert your external hard drive or USB into your computer, and do the “copy-and-paste” step to convert DVD to hard drive or USB.
Extra Tip: How to Copy a DVD to Another DVD on Windows 10
After you copy DVDs on computer, you can also copy them to another blank DVD by using VideoByte DVD Copy. Depending on the output optical drive system, we will need to choose different modes to work. The steps to do so are also pretty simple to handle. When you finish “Step 1. Select File Source” and “Step 2. Select Copy Mode” above, you can then start your work by following the different steps below.
- If you are copying DVD to the 2-disc drive system, remember to directly choose “Save as DVD folder” in the “Target” drop-down menu, after VideoByte DVD Copy has finished loading your DVD.
- If it’s for the 1-disc drive system, you should choose “Save as ISO” in the “Target” drop-down menu. After customizing copying contents, you can start burning the ISO to your new blank DVD
If you have any questions about how to copy DVD by VideoByte DVD Copy, you can always contact the support team for help.
Method 2. How to Copy DVDs on Windows 10 by Ripping to Digital
As mentioned above, due to the format requirements of DVDs, the contents of the DVD will also have a fixed special format, such as DVD+R, DVD-R, etc, which may not be directly played on the computer or player.
To help you more freely watch DVDS on other devices, we highly recommend the VideoByte BD-DVD Ripper for you. It’s a software working on both Windows and Mac systems, which can rip homemade and commercial DVD/Blu-ray discs, ISO files, etc, to regular digital formats. With this best DVD and Blu-ray ripping software, you can copy all kinds of DVDs on any media player to play without worries.
More advantages of VideoByte BD-DVD Ripper:
- DRM-restrictions Removal: Remove any DVD/Blu-ray protection, making it possible to play on any system or media players.
- Multiple Output Formats: With 300+ video/audio formats supported, for you to convert DVD to MP4, MOV, and others, as well as extract the disc audio to MP3, AAC, M4A, etc.
- Highest Device Compatibility: With predefined output files for popular devices such as Apple(iPhone/iPad/Apple TV), Android(Samsung/Sony/Huawei), smartphones, tablets or PS3/PS4 game consoles.
- Lossless Output: Keep the output of the same quality as the original BD/DVD files. In addition, VideoByte BD-DVD Ripper also supports retaining all subtitles and audio tracks of the video by default.
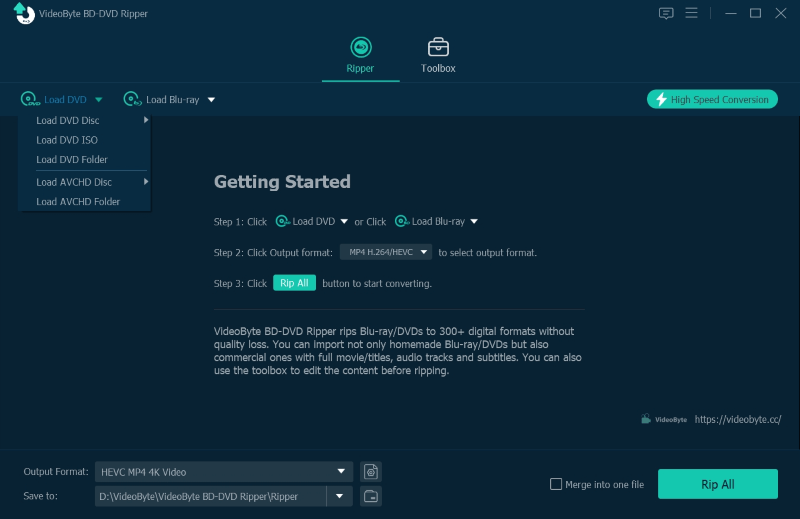
Step 1. Install, Launch, and Load.
Download and install VideoByte BD-DVD Ripper. Insert the DVD into your computer, then open the program. You can click “
Step 2: Choose Titles, Subtitles, and Audio Tracks
After loading, you can click the “Full Title List” and select the titles you want to rip.
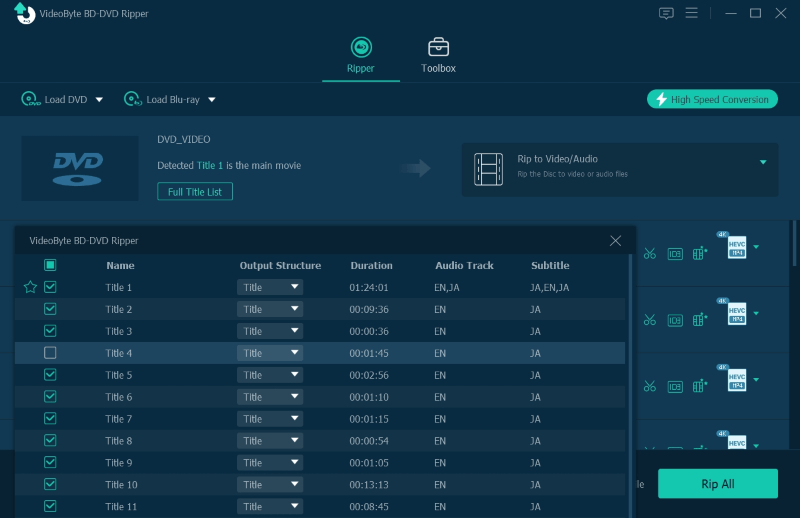
Now you can see the tracks and subtitles of the detected DVD video. Therefore, just select here to rip them together. VideoByte BD-DVD Ripper also allows you to select DVDs with forced subtitles, so you can simply select them when you choose subtitles here.
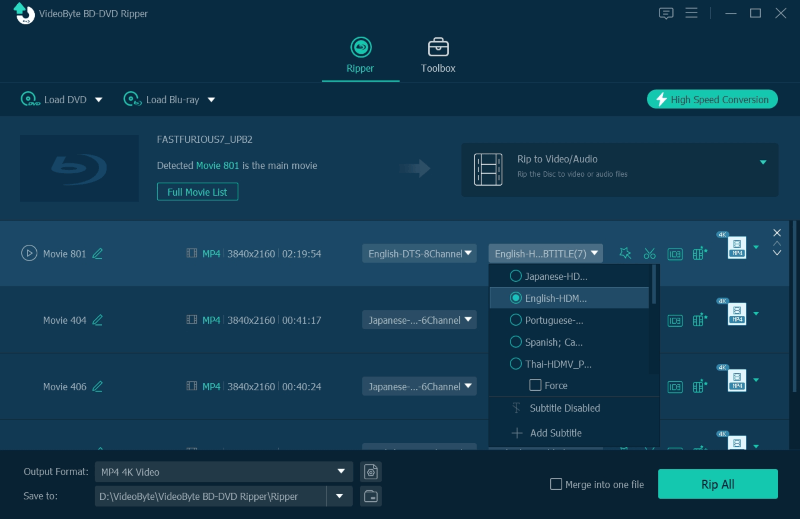
Step 3. Choose Output Format and Quality to Rip
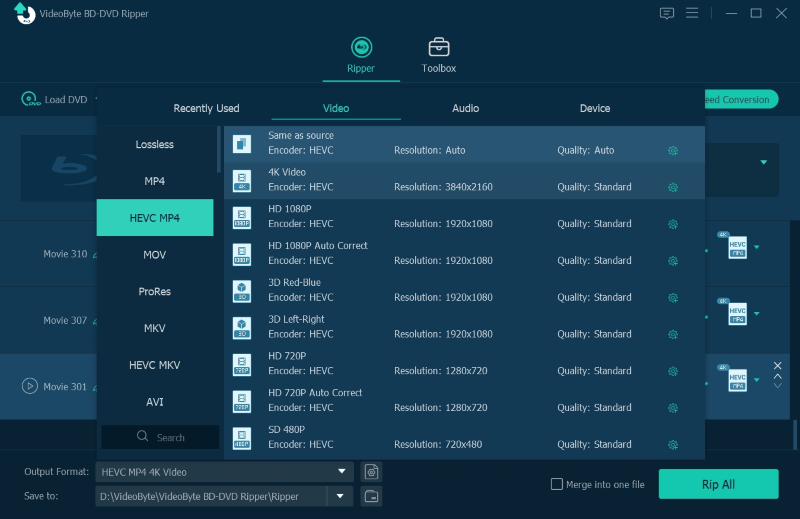
Click “Rip All To” in the upper right corner, and you can then select different formats based on the device or player you want to play the content to. For most players, mainstream formats like MP4 and M4A give you a better experience.
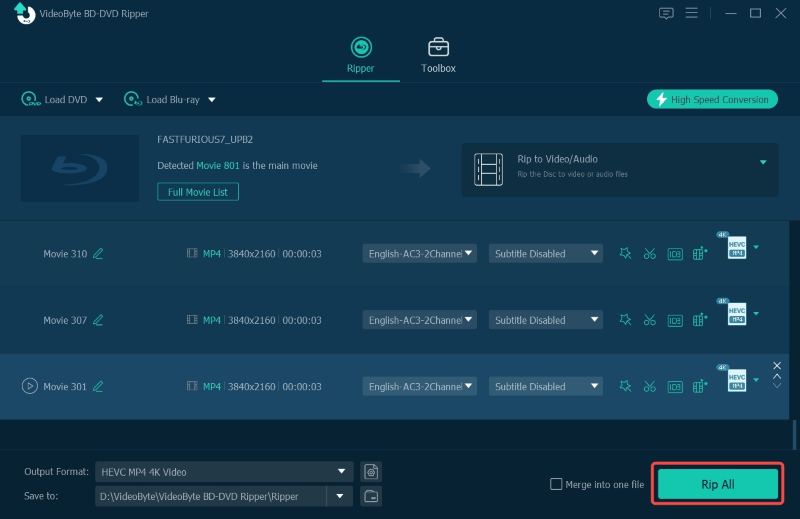
Finally, click “Rip All” to begin ripping and copying DVD to computer efficiently in the format of your choice without any loss of quality.
FAQs of Copying DVDs in Windows 10
Q1: Can You Copy DVD to computer with Handbrake?
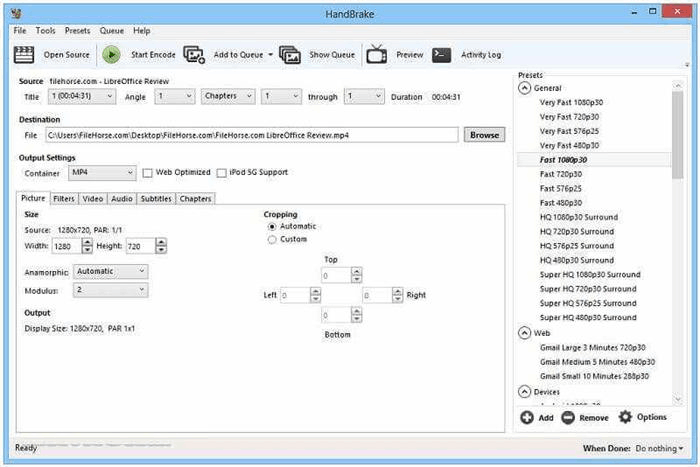
Handbrake as a free and open-source video encoding program is always ready to copy DVD to Windows 10. It can convert most video formats, even including those produced by consumer and professional video cameras. Not only is it a powerful video converter with various preset output formats, but Handbrake also allows you to rip and convert your DVDs. However, when it comes to DRM-protected content, Handbrake is at a loss.
Pros:
- Completely free
Cons:
- No support for DRM-protected DVDs
- No support for cloning DVD to DVD
- No support for VIDEO_TS and ISO image formats
Q2: Can You Rip DVD Content to MKV via MakeMKV?
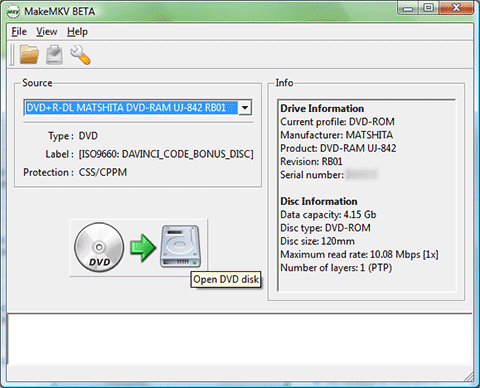
To copy DVD to Windows 10, MakeMKV is a DVD/Blu-ray ripper that supports transcoding most video formats into MKV, which is an open-source and future-proof format. Multiple video/audio tracks with complete metadata and chapters can be stored in the MKV format. Although it is free to rip DVDs, MakeMKV only offers a 30-day free trial for Blu-Ray ripping. Furthermore, as the name suggests, MakeMKV can only output files like MKV.
Pros:
- Free DVD ripping, even with a few DRM-protected ones
Cons:
- Can only output files as MKV
- No support for cloning DVD to DVD
Q3: Is it legal to copy DVDs on Windows?
Laws regarding copying DVDs vary depending on where you live, so it’s best to check your local laws.
But anyway, when copying any DRM-protected content, please strictly keep it for personal use but not commercial use. If you are not certain whether your actions are legal or not, please refer to your local copyright laws.
Conclusion
Above all, you have learned a lot about how to copy DVDs on Windows 10 and rip them into regular formats to play them on any device or player by using VideoByte DVD Copy and VideoByte BD-DVD Ripper, making it possible for you to enjoy the contents in DVDs anywhere, anytime. Click the button below to try the amazing tools for free.


