How to rip video DVD on Mac or Windows? VLC is more than a well-known media player. It is also one of the best free DVD rippers to extract videos with no sweat. Today’s post will guide you on how to rip DVD with VLC on Mac and Windows.
However, if you want to rip a protected DVD, VLC cannot meet your needs. So, there is also a powerful alternative tool, VideoByte BD-DVD Ripper, which is waiting in the wings in case you run across issues such as audio-video sync problems, low video quality, or crashes when you rip DVDs using VLC.
Click here to scroll down directly to see how to rip video DVD on Mac or Windows with VLC.
Before You Rip DVD with VLC: You Should Know
Before ripping a DVD with VLC, please prepare your storage, software, and the DVD you want to rip in advance. You would need:
- An External/Internal Hard Drive:Make sure your computer is equipped with a hard drive to read the DVD. If not, you have to connect an external hard drive to insert the disc;
- VLC Installation on Desktops:Go to the VLC official website to download the corresponding version for Windows or Mac. If you need to rip a copy-protected DVD, also install Handbrake in advance;
- One or Multiple Readable DVD:Make sure the disc you have can be detected by VLC, and list the chapters, format, and other parameters you want to output, so you can quickly proceed with ripping the DVD with VLC.
The steps to rip DVD with VLC on Windows and Mac are not straightforward, and given that it doesn’t directly support encrypted discs, errors like the following can occur during the process.
- VLC cannot read the disk but can play the video;
- Audio or subtitles are out of sync with the video;
- Image distortion, stretching, or incorrect aspect ratio after ripping;
- The quality of the ripped video is lower than the original DVD;
- VLC encounters unexpected errors or crashes;
- …
You also need to know these potential problems in advance. So you can adjust the ripping parameters promptly or switch to a professional-grade tool like VideoByte BD-DVD Ripper to ensure that ripping a DVD with VLC goes smoothly.
How to Rip Video from a DVD on Mac/PC with VLC
When the preparations are well done, you can start to rip DVD with VLC on both Mac and PC. Please review the guide and the important parameters below to ensure success.
Rip DVD with VLC on Mac
Step 1. Use an external hard drive to insert the DVD into the computer. After that, open VLC and also choose “File” on the menu bar to select the “Open Disc” option.
Step 2. With an “Open Source” window showing up, select the “Disc” tab. You will find VLC has detected the DVD. Then just enable the “Disable DVD Menus” and “Stream Output” options.
Disabled DVD Menus will enable you to choose a title and chapter manually.
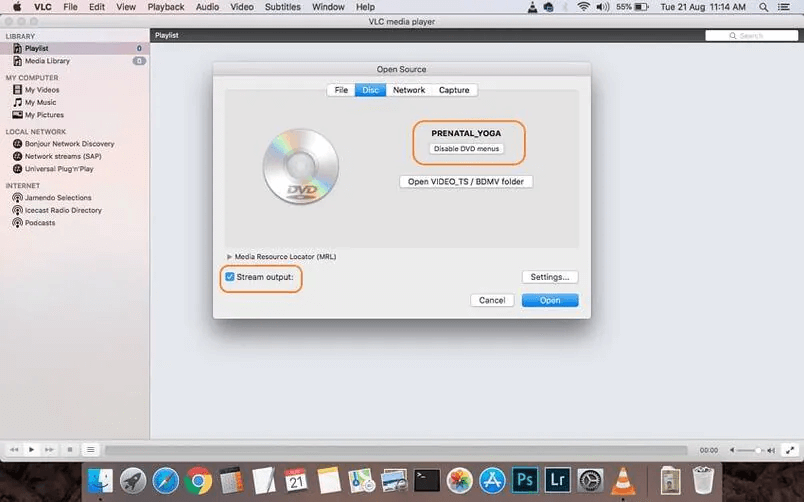
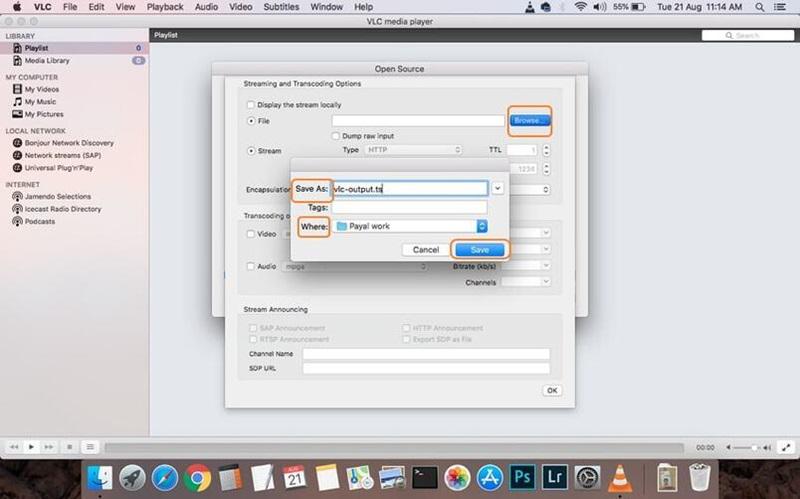
Step 3. Click “Settings” in the bottom right corner. First tick on the “File” box to set up the destination by naming it and choosing a saving folder.
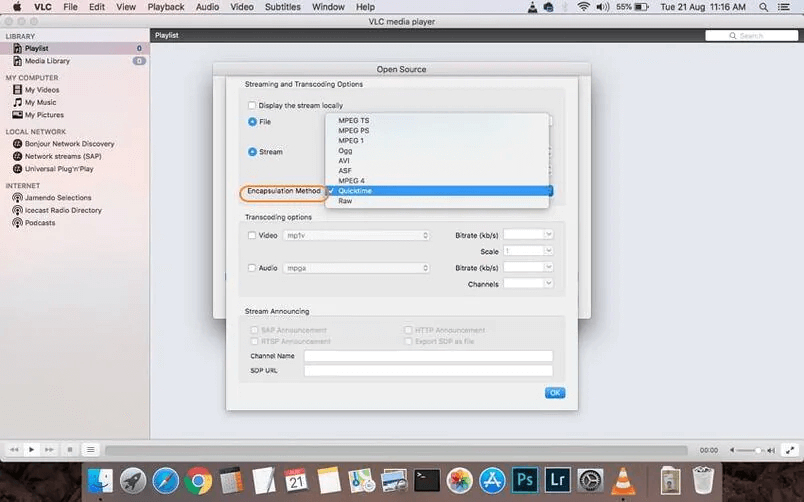
Step 4. Now head to “Encapsulation Method”, where you can choose from MPEG 4, AVI, ASF, OGG, Quicktime, and more formats. It is recommended to choose MPEG 4, as it is compatible with a wide range of devices.
Step 5. “Transcoding options” are customizable based on your needs. However, for wider compatibility, Video – H.264 + (MP3)MP4 is a good choice. If file size is a primary concern, consider Video – H.265 + (MP3)MP4.
Step 6. When the output format and folder are both set, click the “Open” button and VLC will begin to rip DVD for you. The converted videos will all be saved to the folder you set up just now.
Rip DVD with VLC on Windows
Step 1. After inserting the DVD into your computer, open VLC and then select “Media” to find the “Open Disc” option.
Step 2. Go to “Disc” and import the DVD content to VLC by clicking the “Browse…” button next to “Disc device”. Don’t forget to select the “No disc menus” option.
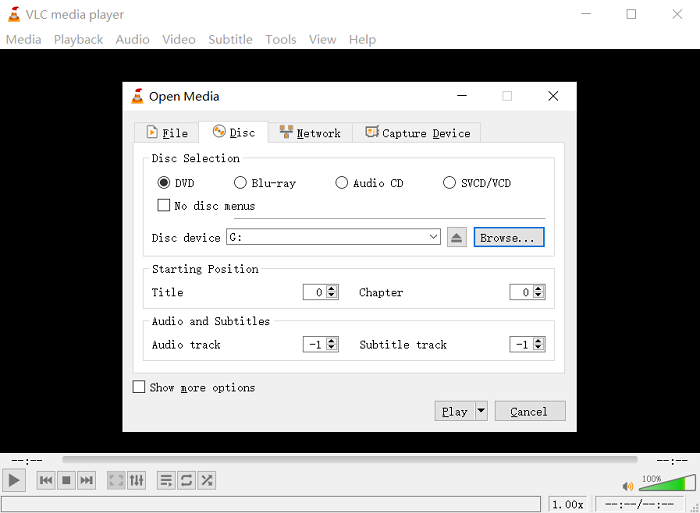
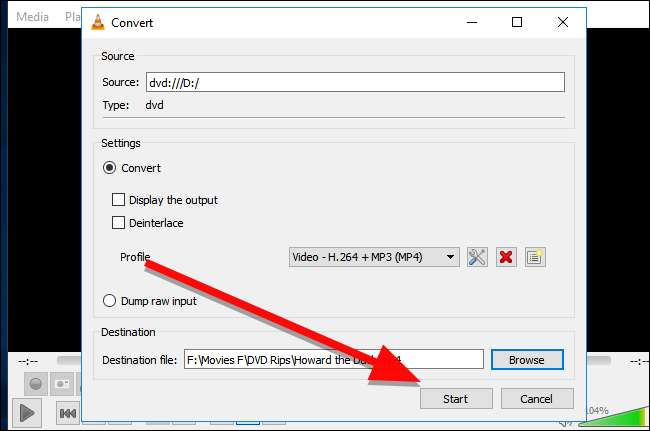
Step 3. Click the “Play”dropdown menu and select “Convert”, which will lead to a new window to set up the output format and destination folder.
Step 4. Select Video – H.264 + (MP3)MP4 from the “Profile” list. Then by clicking the “Browse” button in “Destination”, the output folder can also be set simply.
Step 5. Finally, press the “Start” button, and VLC will begin to rip the DVD immediately. It takes some time to finish, and you just need to wait patiently.
Please be aware that VLC doesn’t support ripping copyright protected DVDs. To address this problem, you need further setup for VLC by virtue of Handbrake or turn to VideoByte BD-DVD Ripper for help. This versatile option can crack various encryption and rip DVDs to MP4 and other multi-device compatible formats.
How to Rip Protected DVD with VLC & Handbrake
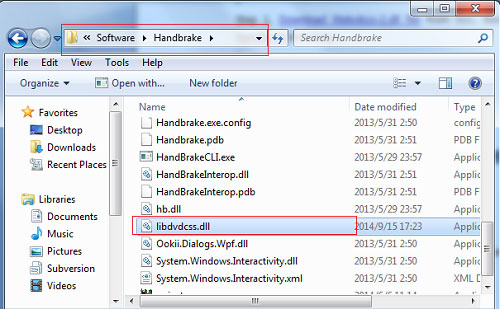
As introduced formerly, to rip DVDs with copy protection using VLC, you need the help of Handbrake, an open-source video conversion tool. However, that’s not all. The libdvdcss.dll file is also necessary. It is an open-source library used to help Handbrake bypass region code restrictions to extract video from copy-protected DVDs. You can only rip DVD with VLC as follows if you have both tools at hand.
Step 1. After downloading the VLC installation package, you need to open its saving folder and find the libdvdcss.dll file. Then copy it and move it to the download folder of Handbrake.
Step 2. Now you can insert the DVD into your computer and open Handbrake.
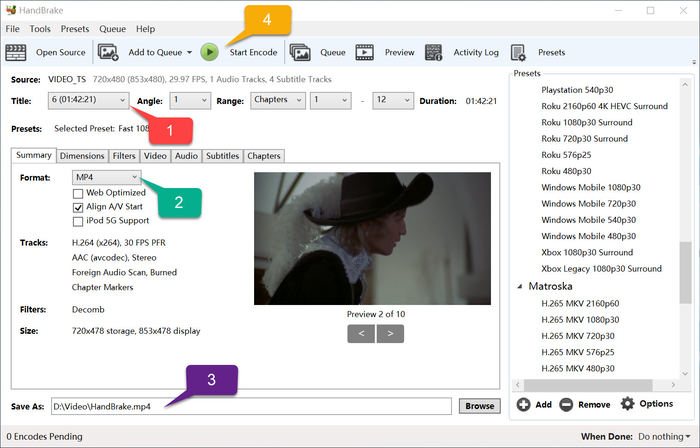
Step 3. In Handbrake, click the “Open Source” button in the top-right corner, then select the DVD to import its videos.
Step 4. Now select an output format or adjust other video parameters as you need. You can also edit the video in Handbrake with its provided simple video editing functions.
Step 5. Press the “Start Encode” button and you can successfully rip the protected DVD to digital files with Handbrake.
Handbrake also supports ripping unprotected Blu-ray with simple steps. See more details in: How to Rip Blu-ray with Handbrake [Step-by-step Guide]
Top Alternative: VideoByte BD-DVD Ripper to Rip DVD Without Errors
Although VLC can rip DVDs for free and even copy video from copy-protected discs with the help of Handbrake, it is complex to use and only handles a limited number of encryption types like CSS. Even worse, potential errors like low quality, aspect ratio changes, and decoding errors can arise due to software versions or settings.
In this case, VideoByte BD-DVD Ripper is strongly recommended to use instead of ripping DVDs with VLC. It supports a wide range of output formats and is compatible with various disc types, including DVD ISO, DVD Folder, and Blu-ray. It can also produce ultra-high-definition output up to 4K.
Compared to VLC, meanwhile, this versatile option is able to break other encryption types besides CSS, such as APS, ARccOS, CPRM, AACS, BD+, and Cinavia. More importantly, it is requires no video decoding knowledge. Simple drag-and-drop movement and settings can make it possible to watch movies on different devices.
VideoByte BD-DVD Ripper: Rip Non or Protected DVD More Easily
- Bypass a majority of disc protections to decrypt DVDs on Mac and Windows.
- Retain a 1:1 ratio to rip DVDs with original visual as well as sound effects.
- Rip all audio tracks, subtitles, and chapters losslessly.
- Speed up DVD ripping at 6X faster with Intel QSV, NVIDIA, and AMD acceleration;
- Support over 300 mainstream formats to digitalize videos from DVD.
Now, let’s look at how straightforward VideoByte BD-DVD Ripper is when you use it to rip DVDs. The following is exemplified by the Windows version.
Step 1. Add General or Protected DVD Disc
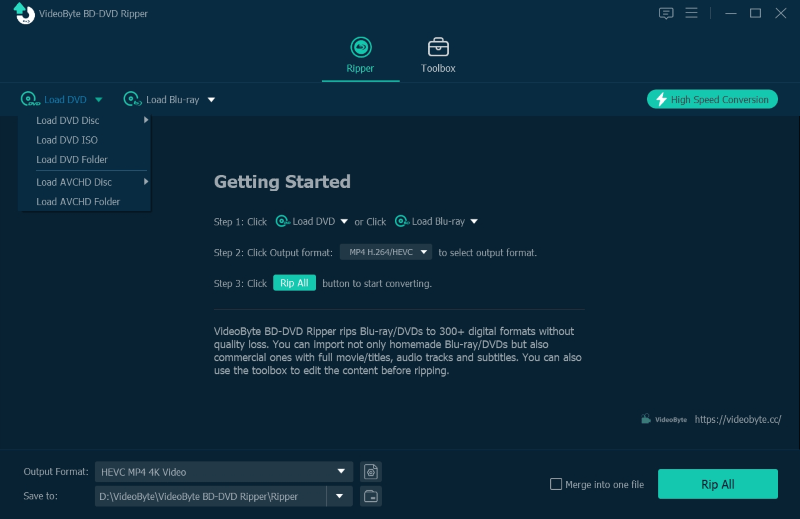
Install VideoByte BD-DVD Ripper with the buttons below first. Then insert the DVD into a drive and open the software to load the disc by clicking the “Load DVD” and selecting “Load DVD Disc”.
Step 2. Choose DVD Movie Titles to Rip
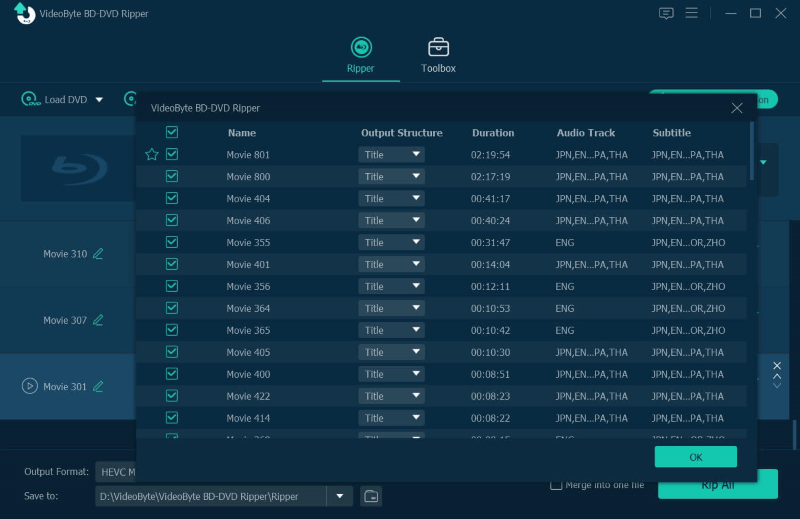
After loading is done, click the “Full Movie List” button to select titles or chapters in the DVD to rip. Or you would rip all of them by default.
Step 3. Set up Output Parameters
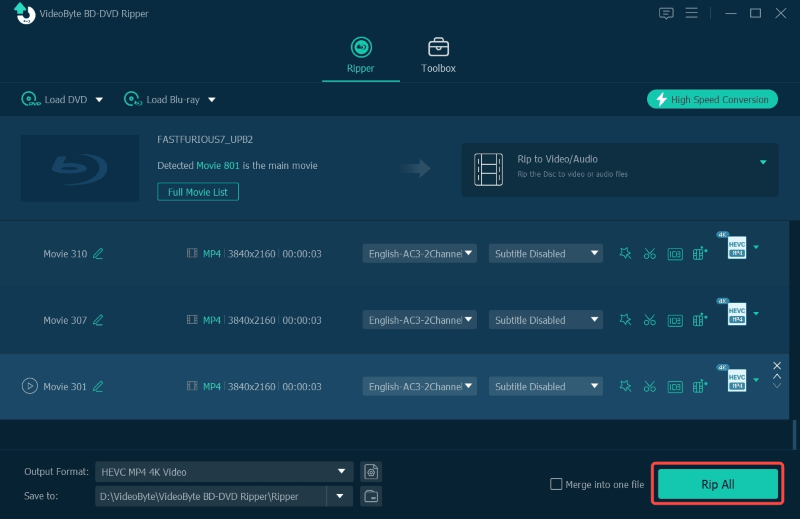
Click on the “Rip All to” button to set up output formats from MP4, MOV, MKV, and other options. Video titles, audio tracks, and subtitles can also be changed on the page to your liking.
Step 4. Rip Protected DVD on PC
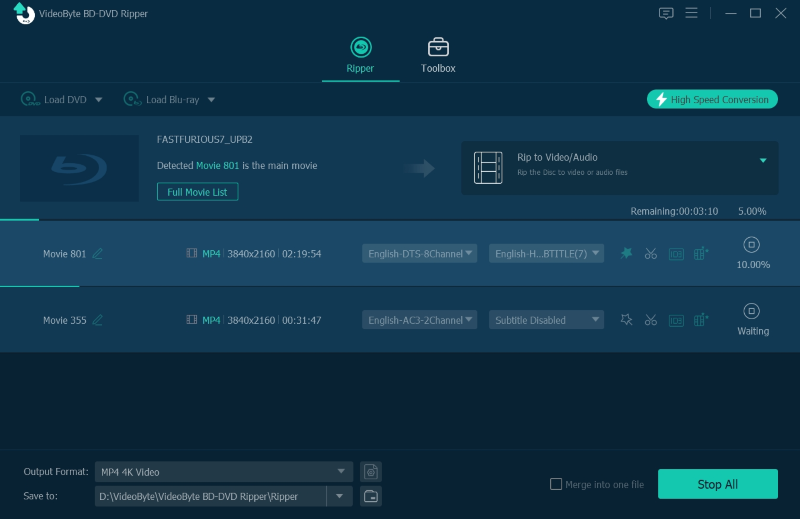
Finally, just start ripping the protected DVD for saving on your computer by pressing the “Rip All” button. VideoByte BD-DVD Ripper will work to rip protected DVD on PC for you in no time.
Steps to rip protected DVD to MP4 on Mac with VideoByte are quite similar to that on Windows. You can see more details here: How to Convert DVD Files to MP4 on Mac Quickly
Comparison Between VLC and VideoByte
It is a feasible way to rip a DVD with VLC. However, VideoByte BD-DVD Ripper is also worth considering due to its simple and diverse features. If you’re still unsure, refer to the table below to make an informed choice.
| VLC | VideoByte BD-DVD Ripper | |
| DVD ripping Speed | Slow (same as the video duration) | 6X faster |
| Supported Formats | Less 100 options | 300+ video/audio formats |
| Output Quality | Compressed | Lossless quality up to 4K |
| Parameter Settings | Only one setting | Multiple options, plus toolbox |
| Protected DVD Ripping | ❌ | ✔ |
| Video Editing | ❌ | ✔ |
FAQs About How to Rip Video from a DVD with VLC
Still confused about some details when you rip DVD with VLC? Walk through these FAQs to help you out.
How to Rip DVD to MP4 with VLC?
To rip DVD to MP4 with VLC, you only need to adjust the output settings to make MP4 the exporting encoder to rip DVDs. Once insert the DVD disc and turn to Media >> Convert/Save to load the disc, subsequently, you can select MP4 or other preferred format to rip DVD with VLC in preferences.
How to Rip DVD Chapters with VLC Player?
VLC player also functions to retain full chapters for the DVD disc you rip with it, and allows you to determine both the starting and ending chapters to rip only the part you wish from a complete DVD media.
To confirm the settings, when you are about to add the disc in the Open Media window, move down and you can preset it, or further personalize audio tracks as well as subtitles settings in preferences.

How Long Does It Take to Rip a DVD with VLC?
Ripping a DVD with VLC takes nearly the same time as the duration of the DVD video. This is because VLC is not equipped with any acceleration technique. If you wish for a faster way, VideoByte BD-DVD Ripper is ideal. It has embedded multi-core hardware accelerations to speed up the ripping to 6X even faster.
Can VLC rip DVD with protections?
In general, VLC media player can't directly rip copy-protected DVDs, but it can rip some DVDs with the assist of additional software, such as libdvdcss and Handbrake.
Conclusion
Now, I guess you have known how to rip DVD using VLC. To wrap up, you can directly rip DVD with VLC if your disc is not encrypted. Although VLC, with the help of Handbrake, can bypass CSS restrictions and extract DVD video, the process can be quite confusing. Therefore, VideoByte BD-DVD Ripper is recommended here for you to easily rip a DVD in Mac or Windows. Its user-friendly operation, hardware acceleration, and superior output quality make DVD ripping more accessible.


