


The Only Ripper to Support Both DVD & Blu-ray
Forward this article:


If you are accustomed to using DVDs to store videos, you may worry about losing them one day when the physical disc is damaged or the media is scratched and cannot be read. Therefore, some people want to copy DVDs to USB to backup their videos.
But how to accurately convert a DVD to a USB flash drive? don't worry! We have provided various feasible assistance in this article! Now, scroll down and choose from the 5 best ways to convert DVDs to MP4 or other formats, including the best Blu ray Ripper, to successfully copy DVDs to USB!
Direct copying is the simplest way to transfer a DVD to a USB. However, this method has some limitations and drawbacks.
If you only want to copy homemade DVDs to USB flash drive, you can do as follows:
Step 1. Insert the DVD into the disk drive and plug in the USB flash drive into the USB port.
Step 2. Open the DVD drive in File Explorer (Windows) or Finder (Mac).
Step 4. Paste the files onto the USB flash drive.
Best for: convert protected DVDs to USB in uncompressed original quality and ultra fast speed.
VideoByte BD-DVD Ripper is equipped with sparkling ability to rip DVD/Blu-ray discs with all types of protection techniques, offering 300+ formats to export them in digital copies. The program will maintain a 1:1 ratio to reserve original image as well as audio effects to encode the output video files. With full audio tracks and subtitles accompanied, you are able to regain the equally same streaming experience after ripping DVDs to computers.
Furthermore, VideoByte BD-DVD Ripper also enhances its performance with hardware acceleration techniques applied to copy protected DVD. Plus the batch ripping feature, you can completely convert DVD to USB effortlessly and swiftly!
To sum up, VideoByte BD-DVD Ripper will deliver the following amazing features to enable a more friendly experience for you to copy DVD to USB smoothly:
To copy DVD to USB flash drive, VideoByte BD-DVD Ripper supports selecting ISO image or digital formats respectively.
Option 1. Copy a Full Lossless DVD ISO File
If you intend to keep a permanent storing of the data on DVD, it’s an ideal option to copy DVD to a lossless ISO file. The original content from the DVD can be saved digitally as ISO on your USB drive, and you just need to install a virtual drive to your computer and enjoy the DVD content from ISO with the USB drive everywhere at any time.
So how to transcode your DVD to be an optical disc image and then copy DVD to USB successfully? Please follow the tutorial.
STEP 1. Install VideoByte BD-DVD Ripper
VideoByte BD-DVD Ripper is well-compatible to all devices with Windows 10/8/7/Vista/XP (SP2 or later) and macOS X 10.7 and later. The setup process is easy to go through. After installation is done, click on the icon to launch the program.
STEP 2. Connect DVD to Computer
It’s time to hook up your desired DVD to the computer. Then, select Load DVD and then Load DVD Disc to start loading the connected DVD as the source.

You should be able to see the movie list scanned and shown in the program. It’s okay to select all the movies and copy to a full lossless DVD ISO file. Click Rip to Video/Audio and select Rip to DVD ISO File from the dropdown menu.
STEP 3. Start the Ripping Process
Now, click the Rip All button on the lower right and the ripping process should be on. You’ll learn the remaining time after the task feed. Simply swipe up some TikTok videos and the ripping will be done.
Note that you can enable the Hardware Acceleration feature next to the settings icon.
STEP 4. Move ISO File to USB
You can open the output format by clicking the Folder icon. Please insert the USB flash drive and manually move the ISO file to it. Congratulations. All is done.
The video tutorial is provided here to guide you clearly to rip DVD to ISO using VideoByte BD-DVD Ripper before converting DVD to USB:
VideoByte has just released VideoByte DVD Ripper to be the alternative to VideoByte BD-DVD Ripper. It’s a dedicated DVD to digital ripping program that supports input of DVD or related files, and keeps all DVD ripping features of VideoByte BD-DVD Ripper. If you just need a tool to rip DVD without ripping Blu-ray features, this lightweight DVD ripper is a reliable choice.
The only difference between VideoByte DVD Ripper and VideoByte BD-DVD Ripper is the former does not support the Blu-rays.
Option 2. Rip Your DVD to MP4 in High Quality
You can also opt to extract data from DVD to HD MP4 format. This allows you to watch DVD videos without the burden of DVD players and DVD drivers, making it easy to view the videos in players on desktop or mobile phones/tablets. The whole process is basically the same as above but has slight differences.
STEP 1. Install the Program
Every story begins with the setup of the software. Simply follow the instructions to complete the installation of VideoByte BD-DVD Ripper. Then, launch it.
STEP 2. Load DVD in the Program
Now, insert your DVD into the computer and read the DVD by loading it in VideoByte. It may take a while to finish loading if your DVD stores many excellent movies or videos.

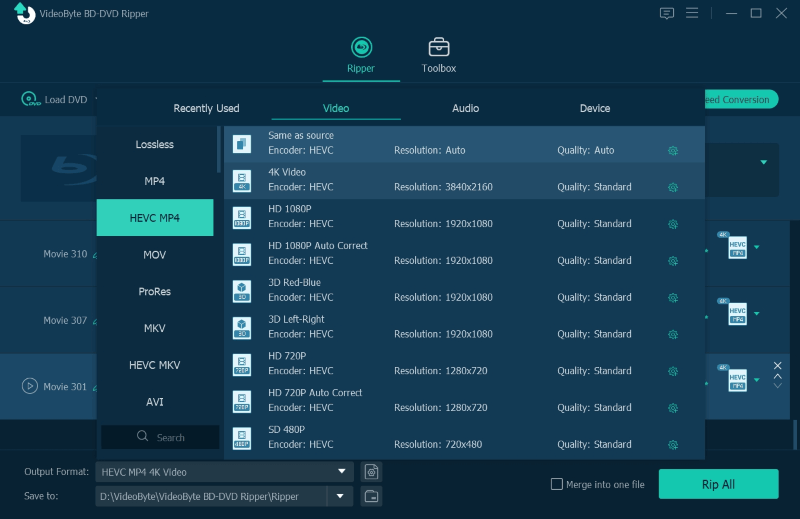
STEP 3. Rip to HD MP4
After the DVD is read, you should see a movie list. Please make the selection of videos which you want to rip on DVD. Then, click Rip All to to drop down the menu. Please select MP4 and an output option from different resolutions (it’s recommended to keep it as the source). After that, hit the Rip All button to start ripping the DVD to MP4. You can enable hardware acceleration to speed up the encoding process.
STEP 4. Transfer DVD to USB Flash Drive
It should be quick to finish transcoding DVD to MP4 in high quality. After that, you should open the output folder and copy the MP4 file to your flash drive. Now, you can enjoy watching or transferring the videos previously on DVD with ease.
You May Also Like:
Top 8 Blu-ray Rippers for Windows & Mac
Best for: write full DVD data without in lossless quality and a lightweight process efficiently.
An alternative and lightweight option you can try converting DVD to USB is by utilizing a DVD copy software, which is oriented for writing DVD data as disc capable format like ISO image or VIDEO_TS folder, guaranteeing lossless quality in exporting DVD disc content.
VideoByte DVD Copy offers professional assistance to help you achieve this goal. It will retain full quality and all original audios as well as soundtracks, without losing any data to copy DVD to ISO/VIDEO_TS for you to move on to a USB hard drive later on.
Similarly as VideoByte BD-DVD Ripper, the program is capable of encrypted DVD discs copying. Also with the adjusted duplicating speed, you can copy DVD to USB efficiently in quite a time-saving way. Please walk through how it works to copy DVD to computers for you below:
STEP 1. Load DVD in Program
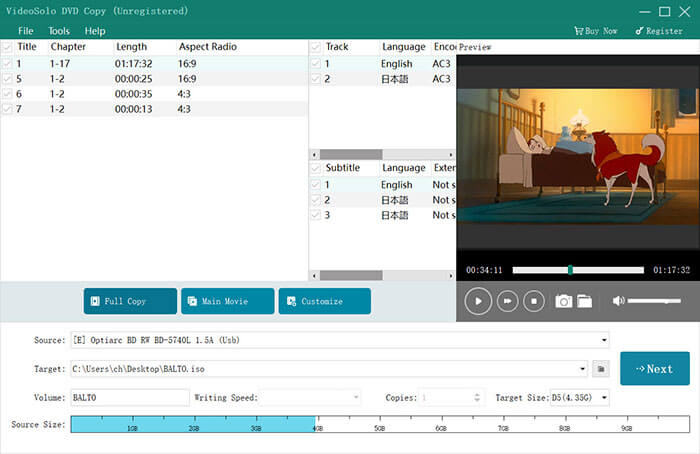
First, complete the simple setup and run VideoByte DVD Copy on computer. You ought to insert the DVD disc you wish to back up to USB flash drive and load it in VideoByte DVD Copy by clicking on File >> Select Source in the program.
STEP 2. Select Format and Copying Mode
When the DVD disc is loaded, please turn to File >> Target and select ISO or VIDEO_TS as the output format. Subsequently, also select a copying mode from Main Movie, Full Copy, or Customize in preferences.
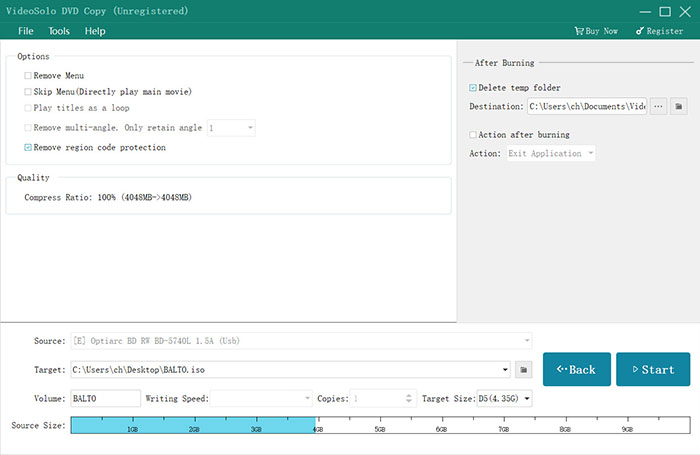
STEP 3. Adjust Copying Settings
Click on the Next button and further adjust copying settings such as Remove/Skip Menu, Remove region code protection, and more to customize the output DVD backup file.
STEP 4. Copy DVD to Create Backup
Subsequently, simply tap the Start button and VideoByte DVD Copy will initiate the copying process. Please wait for minutes till it completes the work.
STEP 5. Transfer DVD to USB
Once getting the ripped DVD backup file, please insert the USB flash drive to computer. Finally, simply drag and drop to transfer DVD to USB in no time.
To freely copy DVD to USB, you can also turn to the cross-platform supported media player, VLC Media Player that many of you may have installed before to copy DVD to USB without cost. VLC provides a hidden ripping function, making it also one of the best free DVD rippers you can trust. It will offer many widely-supported audio/video formats such as MPEG-2, MPEG-4, H.264, MKV, WebM, WMV, and MP3 to export DVD copies. After getting the regular media files, you can directly move them to USB flash drive for storing them.
Best for: users who don’t have a computer to transfer DVD to USB from cloud.
If you wish a program-free way to transfer DVD to USB without computer, you can actually turn to some DVD to USB services to help. Such kind of services will send the disc content to the service providers, and they will detect your DVD and convert it to digital formats, allowing you to save to USB drive later on. Some popular services you can trust to copy DVD to USB including the following options:
For MemoryCloud new users, you can access Walmart Photo for 60 days without any charge once setting up the account (when it expires, you need to pay for downloading the digital copies). As you have ordered a YesDVD, Walmart DVD, DVD, CD, VCD, and MiniDVD disc, the digital copy will be automatically stored on MemoryCloud and let you download. Here are the steps to process:
Step 1. Complete an online order to purchase the DVD disc you like (make sure the item will be dropped off from a Walmart store or is marked with a UPS shipping label).
Step 2. Wait for the auto-digitalization of the DVD disc. It probably takes one or two days since the purchase date.
Step 3. Log into your MemoryCloud account to find the digital copy and download it for dropping to USB later.
Another helpful service working to help copy DVD to USB can be Forever Studio. It can be accessed from a Forever Safe USB, a Forever Cloud link, or a DVD set. To process copying DVD to USB, you only need to follow several easy procedures as the following shows:
Step 1. In Forever Studio, simply enter the quantity of DVD discs you wish to copy to a USB flash drive.
Step 2. Select the receiver as USB.
Step 3. Complete the transfer and copy DVD to USB.
Still hold confusions on converting DVD to USB? Please walk through the following FAQs and see if they help.
Why my DVD player Cannot read USB?
When you wish to insert your USB flash drive and play the DVD videos in a DVD player, only finding the device failed to read USB, consider whether the USB is damaged or faulty. If not, your USB flash drive may have been formatted with the NTFS file system, so the player fails to detect and read the content from it. To resolve this issue, you need to switch using another USB flash drive formatted with either FAT32 or NTFS file system to enable successful streaming.
Why I fail to copy DVD to USB directly?
Actually, many on-sale DVDs are encrypted with protection techniques, meaning that you won’t be able to copy them directly. Instead, you will need third-party programs such as VideoByte BD-DVD Ripper or VideoByte DVD Copy, which are also equipped with the protection ripping ability to bypass such obstacles to ensure a successful DVD to USB copying process for you.
Above all, if you are wondering how to transfer homemade DVDs to USB flash drive, direct copying and VLC media player can come to help you out.
But for protected DVDs, you should resort to professional software like VideoByte BD-DVD Ripper or VideoByte DVD Copy. It’s more convenient than VLC, and is easy to get started without long waiting time during ripping. Also, if you wish a way to copy DVD to USB without computer, some specialized services are also helpful. Please select the method you feel most convenient to save both your time and effort!
Hot Articles
by in 6 November, 2024
by in 1 November, 2024
by in 21 April, 2026